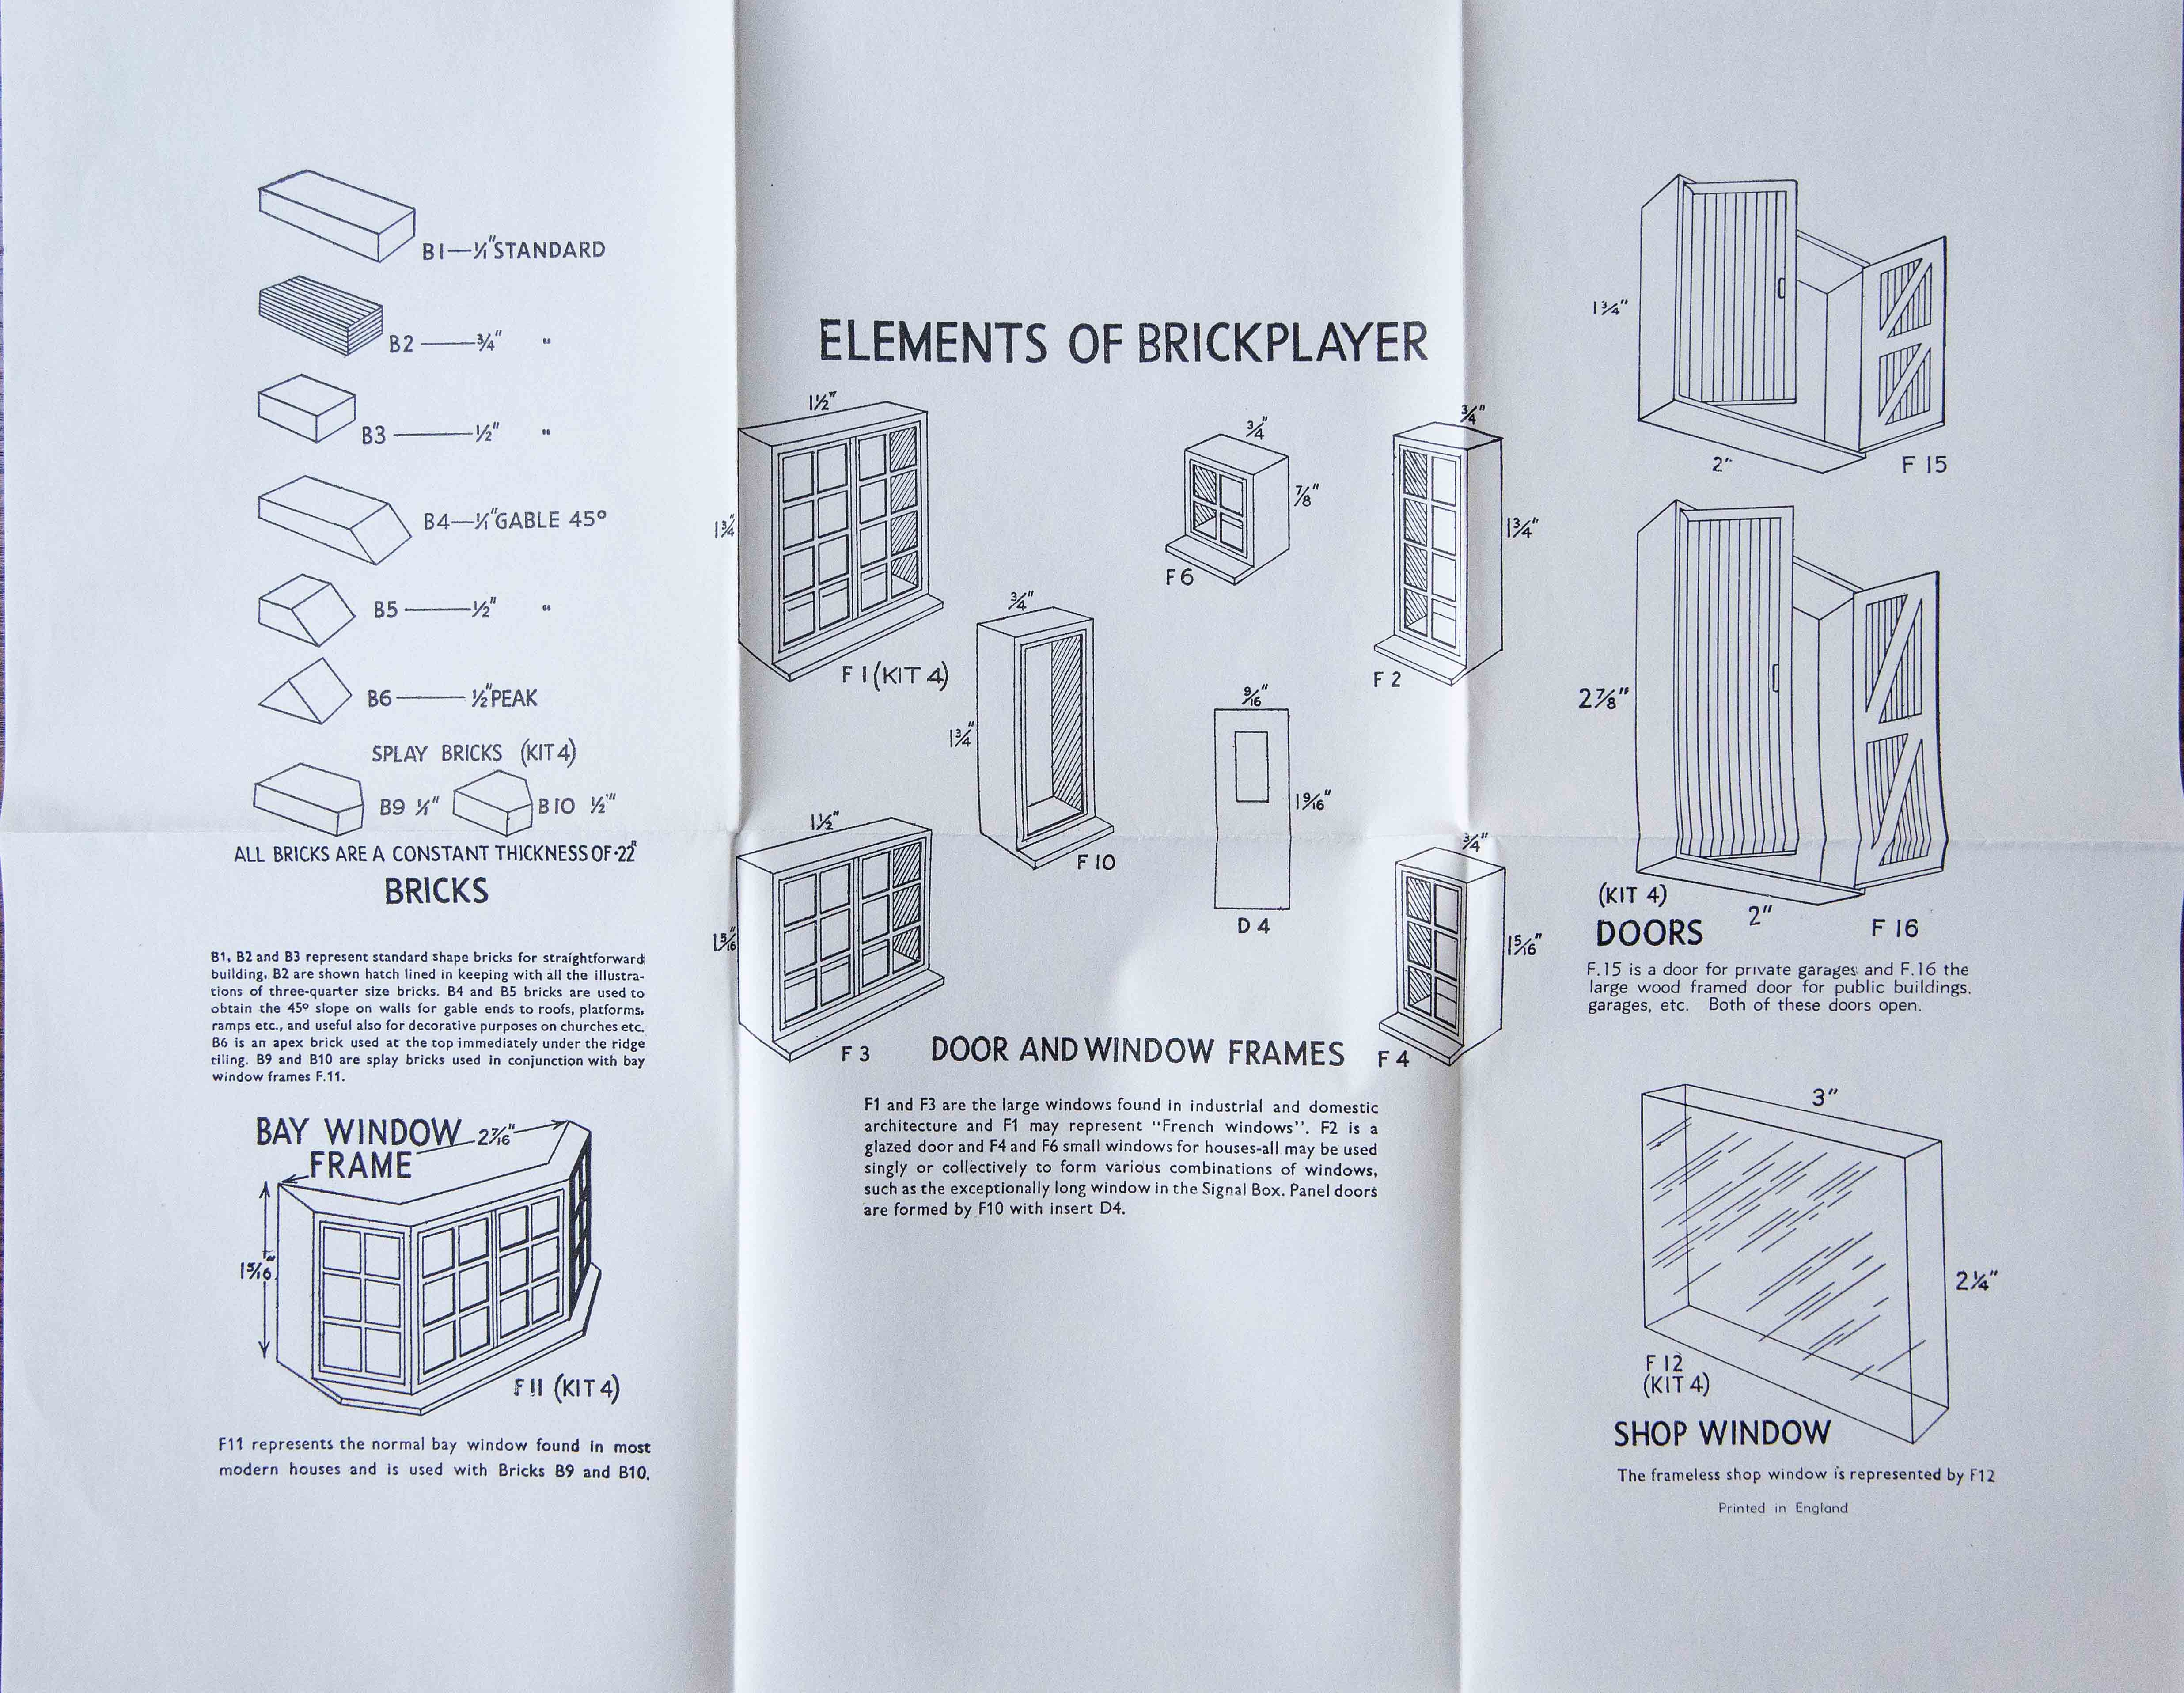
A full brick, which was 1" long, therefore was implicitly 4 feet long in the scaled up building. Of course, real bricks are not this big. In the 1950s and 1960s, a UK standard brick was 9" long, 3½" high and 4½" deep, but scaling this down by 1:48 would mean unfeasibly tiny bricks to work with (and ridiculous amounts of time to build with). The Brickplayer bricks are a compromise, but they retain the feature that the depth is half the length. Thus a full Brickplayer brick is 1" long and ½" deep. However, it is 7⁄32" high, allowing more flexibility in the heights of windows, etc. Thus an individual course of bricks would be 7⁄32" high. The fact that bricks are ½" deep means that walls are implicitly 2 feet thick in the scaled up building. That is unrealistic but reducing that depth to something more realistic would have given models less stable walls. It does mean that buildings cannot have realistic internal walls - Brickplayer was never designed to build dolls houses! The sheet below shows the elements of Standard Brickplayer Kits 3 and 4 and their dimensions. (Clicking on the image or on the title underneath the image will show it full screen, making it easier to read the dimensions.)

The image below shows actual components.
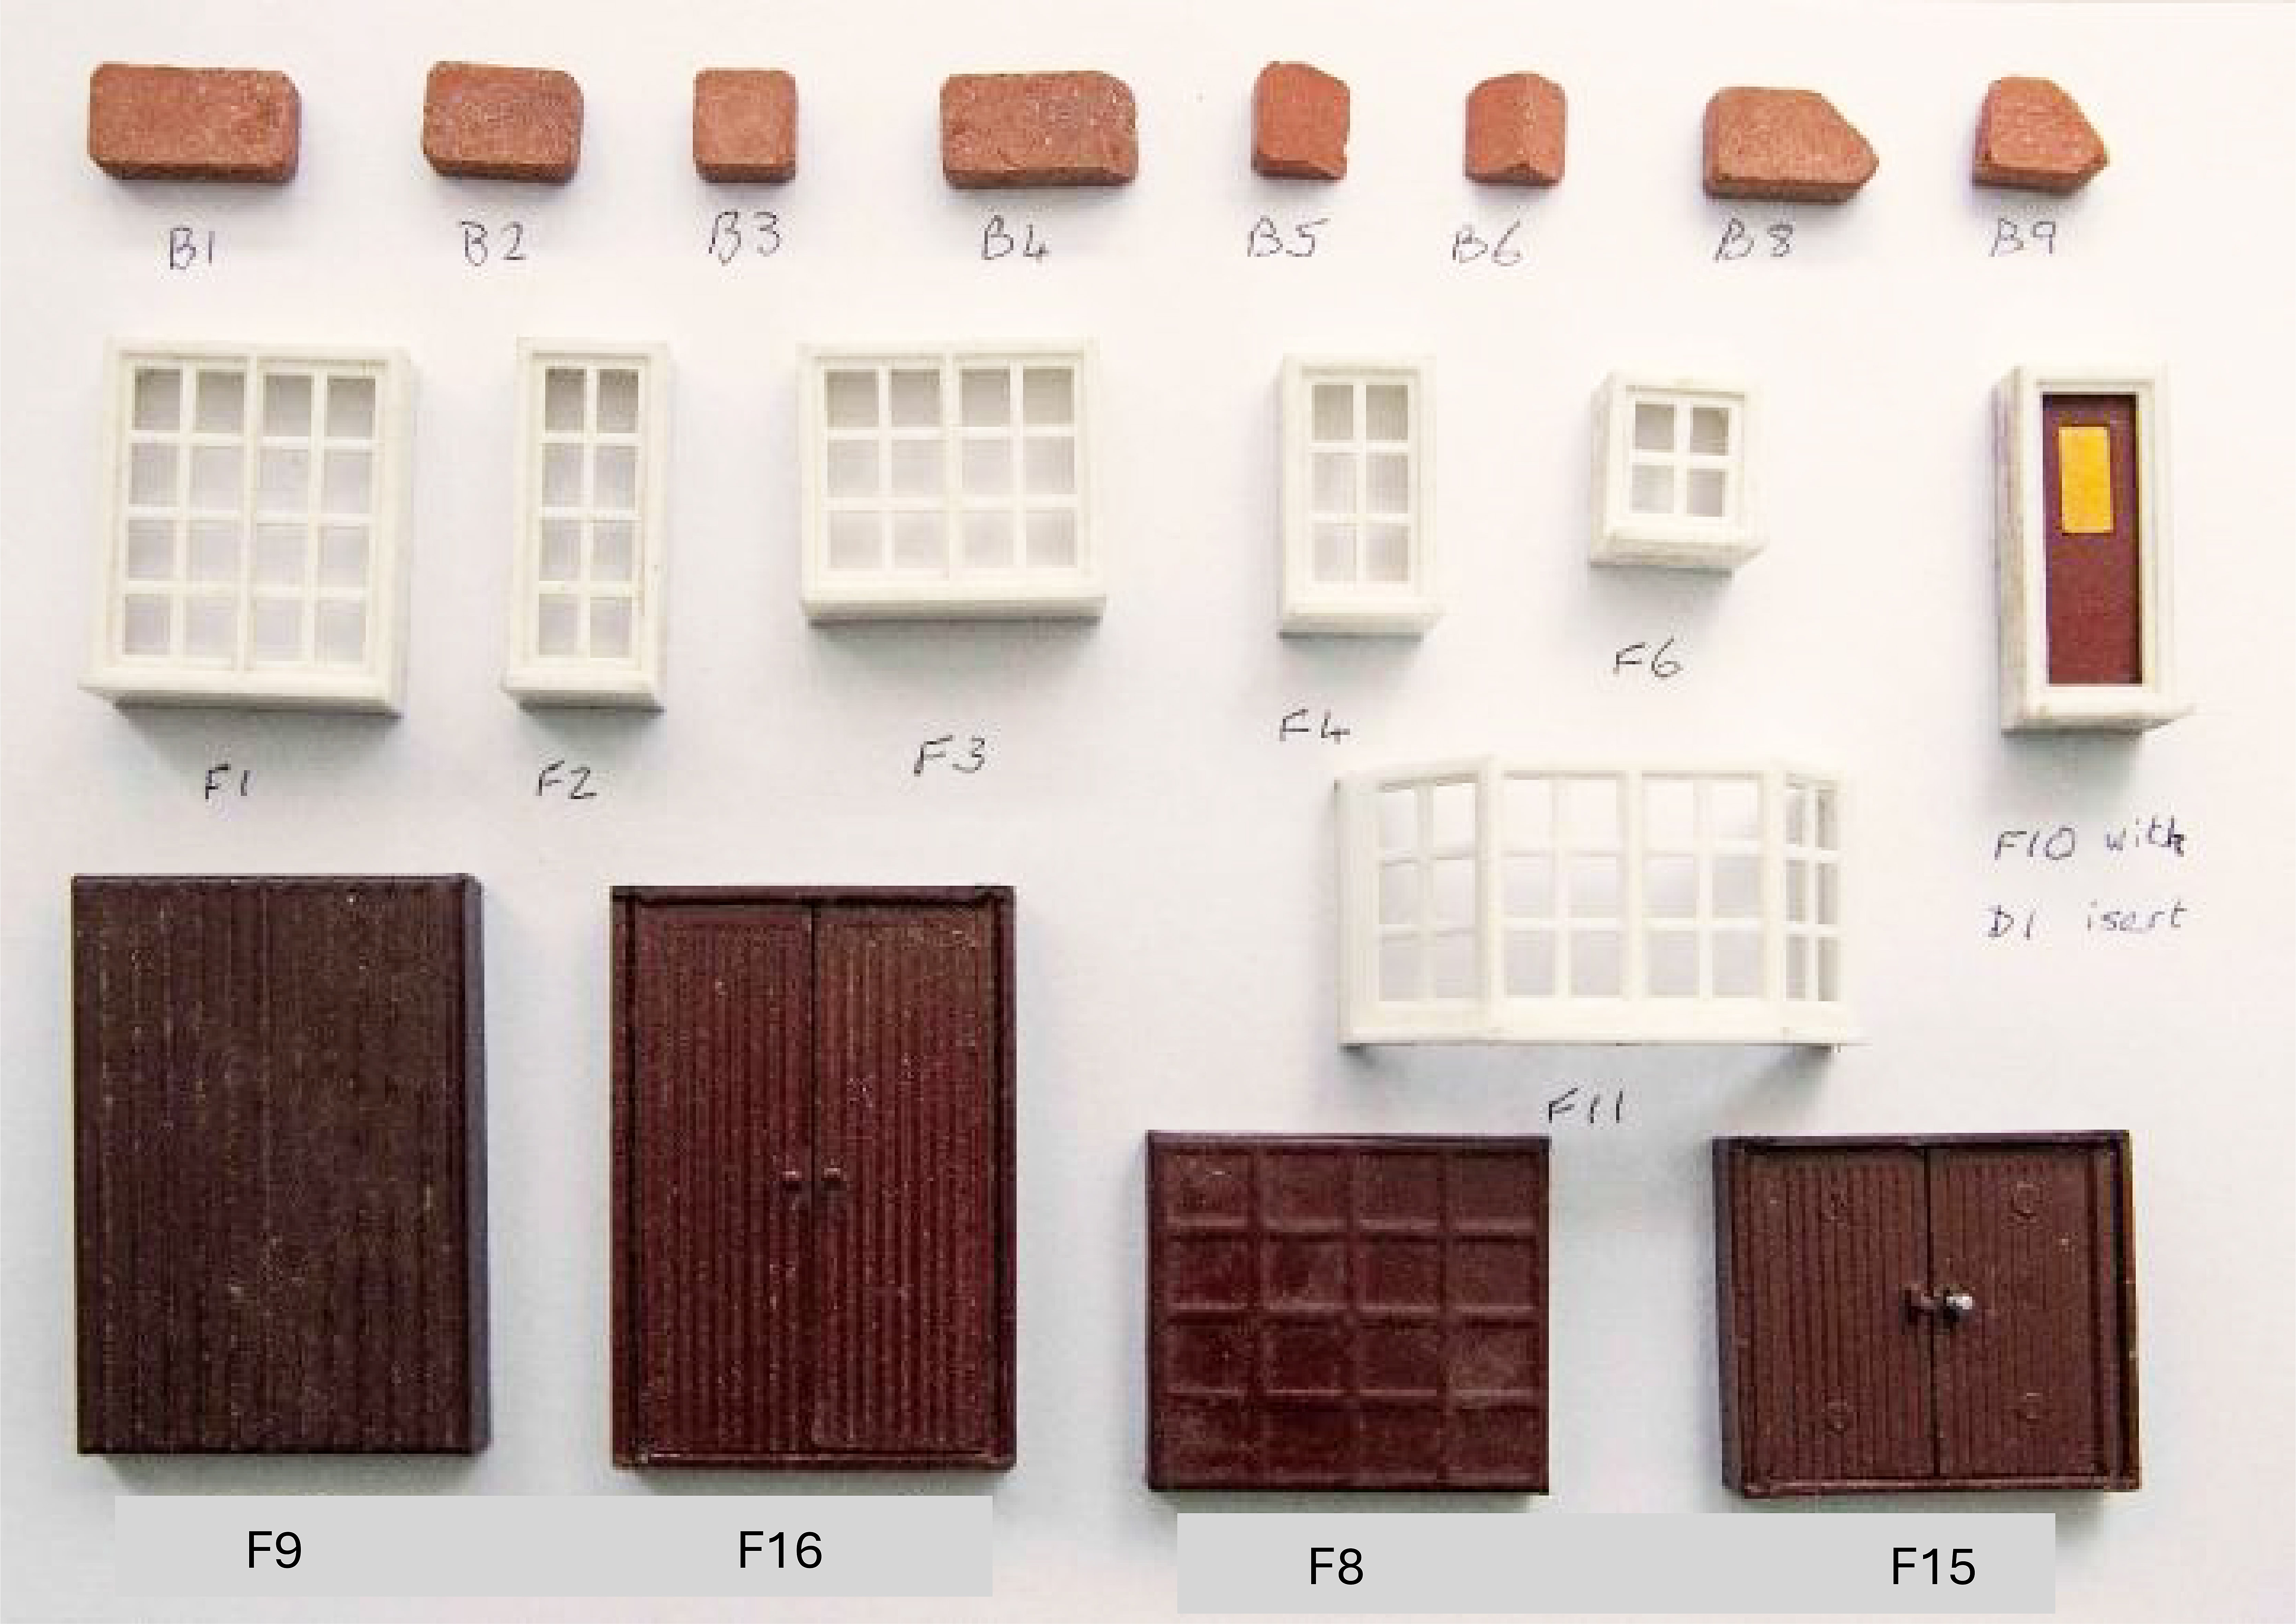
Brick B1 is a full-size brick, B2 is a three-quarters brick (length ¾") and B3 is a half brick (½" long). These were the basic workhorses of Brickplayer construction. Kits contained hundreds of these bricks.
Bricks B4, B5 and B6 were for creating gable ends, with B6 being the apex brick. The "splay bricks" B8 and B9 enabled walls to turn a 45° angle, and were used for creating bay windows (only provided in Kit 4). See the instruction booklet for how these more specialised bricks were used in some of the models.
Five different basic window sizes were produced, ranging from the largest, F1 (only in Kit 4), to F6, the smallest. The bay window F11 only came in Kit 4. The shop window F12 (also only in Kit 4) was not very convincing. It had no frame and easily became distorted or bent - I do not have a decent surviving specimen. The widths of these windows match with brick lengths, the smallest ones being ¾" wide. The heights were designed to correspond to an exact number of brick courses. For instance, the tallest ones, at 1¾" high, correspond to 8 courses.
The remaining elements are three doors. The frame F10 could be used with or without the insert D1. Without the insert it can be a window or a simple glazed door. With the insert it is definitely a door. The width of ¾" scales up to 3 feet, the width of a standard door (with frame). The other two doors are garage or industrial doors in different sizes. The first Standard Brickplayer kits had solid doors identified as F8 and F9, but later they were hinged to open and named F15 and F16. The first kits also had metal window and door frames, but these were later replaced by plastic.
Finally, the Farm Kit introduced three new elements, a new window F7, a stable door F13 and a wicket gate F14, shown in the image below.
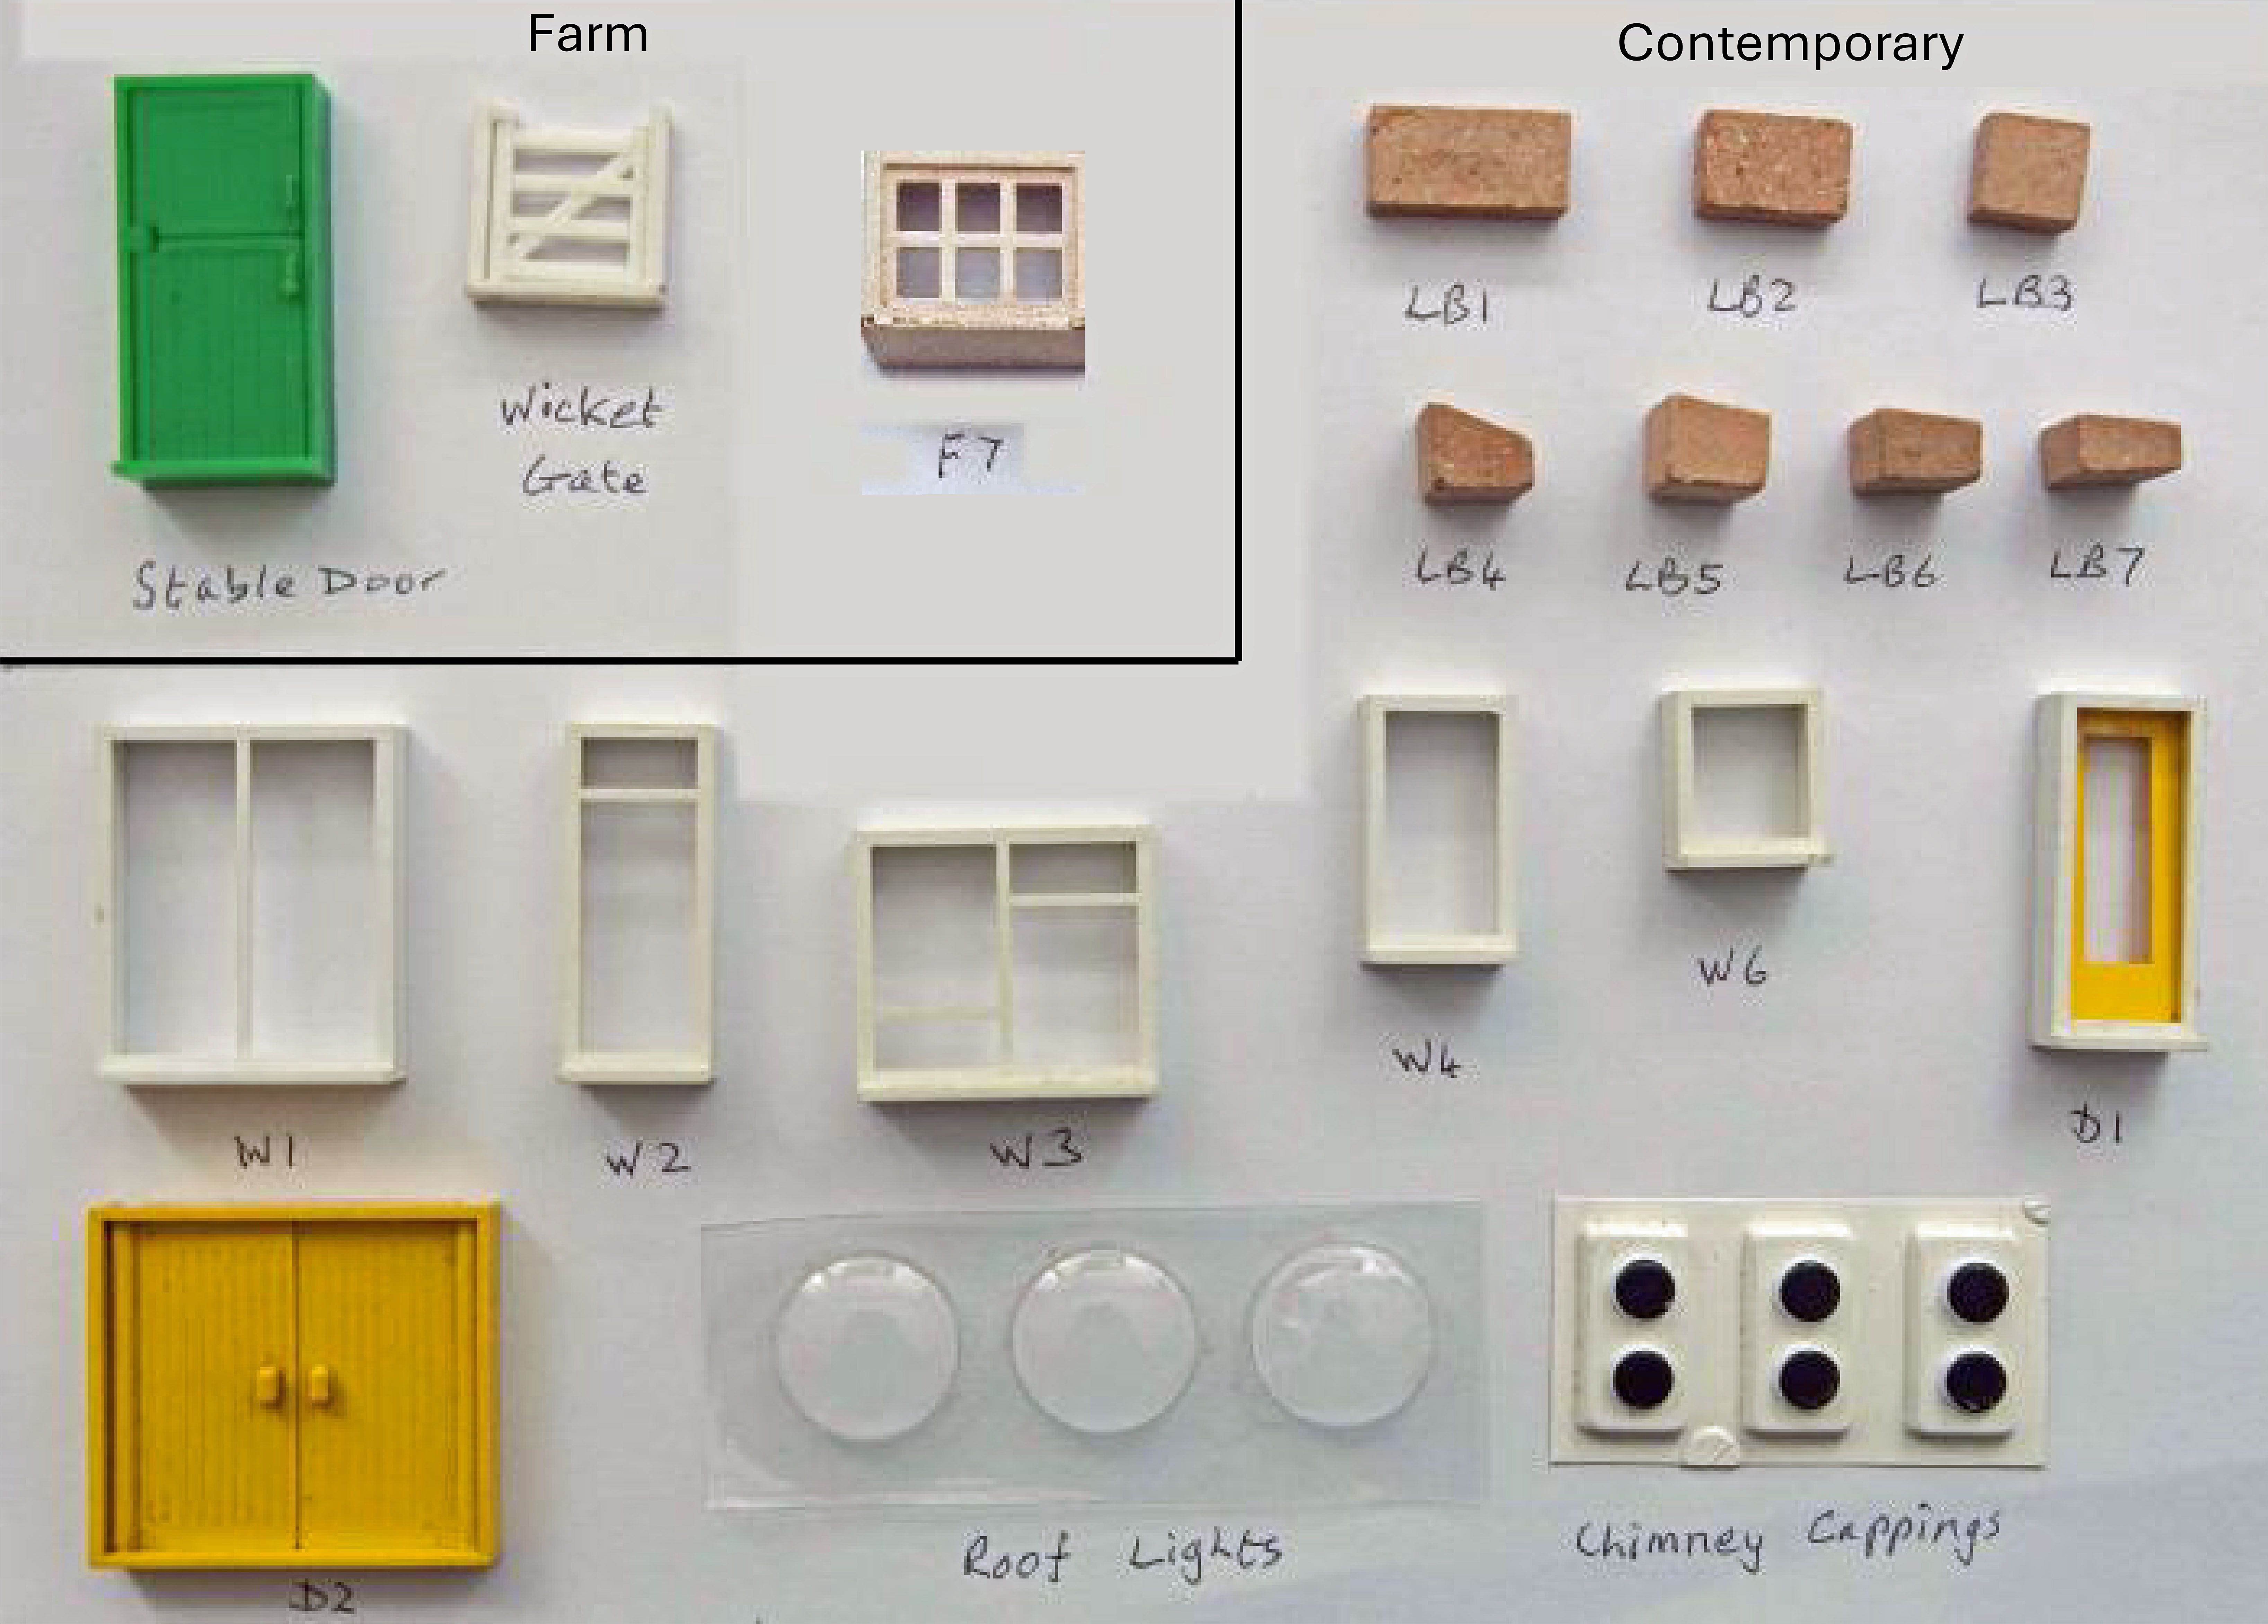
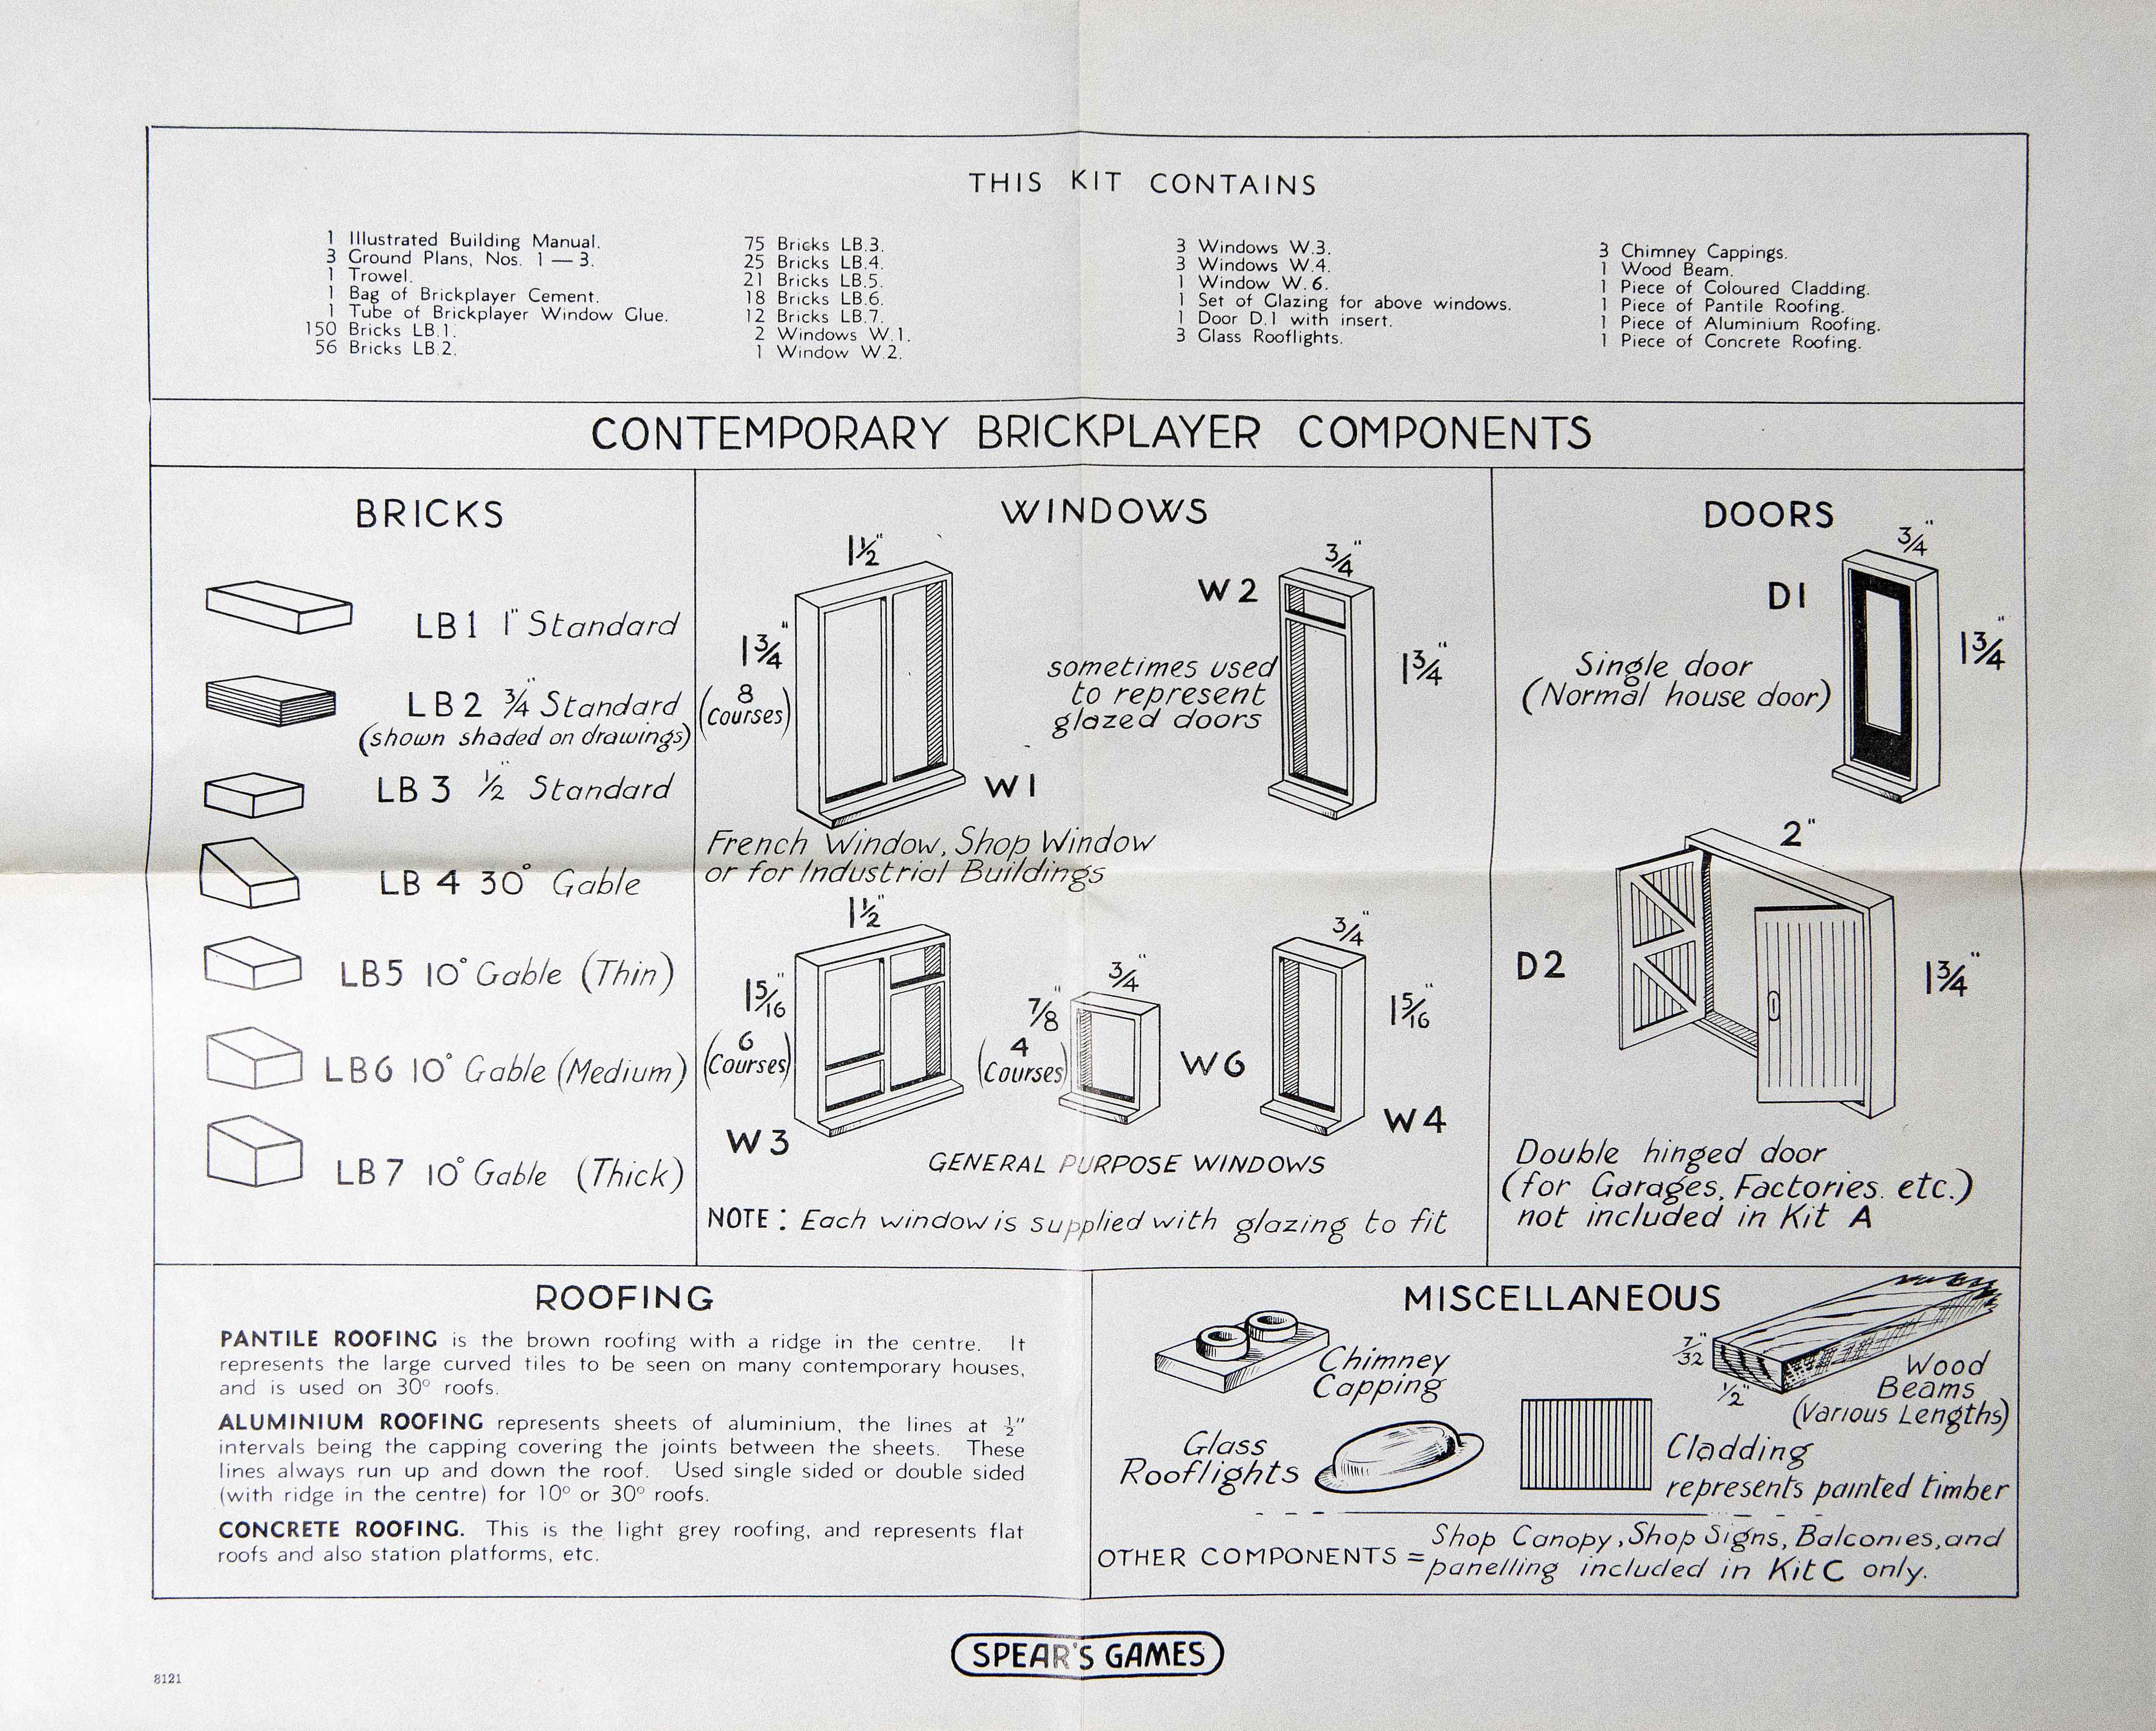
Contemporary Brickplayer was a substantial redesign. First, bricks B1, B2 and B3 are replaced by LB1, LB2 and LB3 in a lighter colour. They also lack the chamfered edges and rounded corners of the Standard Brickplayer bricks, reflecting the harder lines of 1960s and late 1950s aesthetics.
The gable bricks B4, B5 and B6 are gone, replaced by bricks LB4, LB5, LB6 and LB7 to create roofs with shallower slopes. To show this clearly, these bricks have been pictured side-on in the above image. The Standard Brickplayer gable bricks sloped up one course per ¼", whereas using the new LB4 the gradient, also known as the pitch of the roof, reduces to one course per ½". Bricks LB5, LB6 and LB7 are used as a set to create an even flatter pitch of one course per 1½". Standard Brickplayer bricks B8 and B9 were dropped; Contemporary Brickplayer buildings did not have 45° angles.
The windows are redesigned and designated W1 to W6. The small square panes of the Standard Brickplayer windows are gone, again to reflect more modern styles. There is no bay window (a feature that would then have been considered old-fashioned) and only the smaller garage door. It is yellow, as is the insert for the regular door.
Two new elements are the roof lights and chimney cappings, which were always supplied in strips of three to be cut apart as needed.
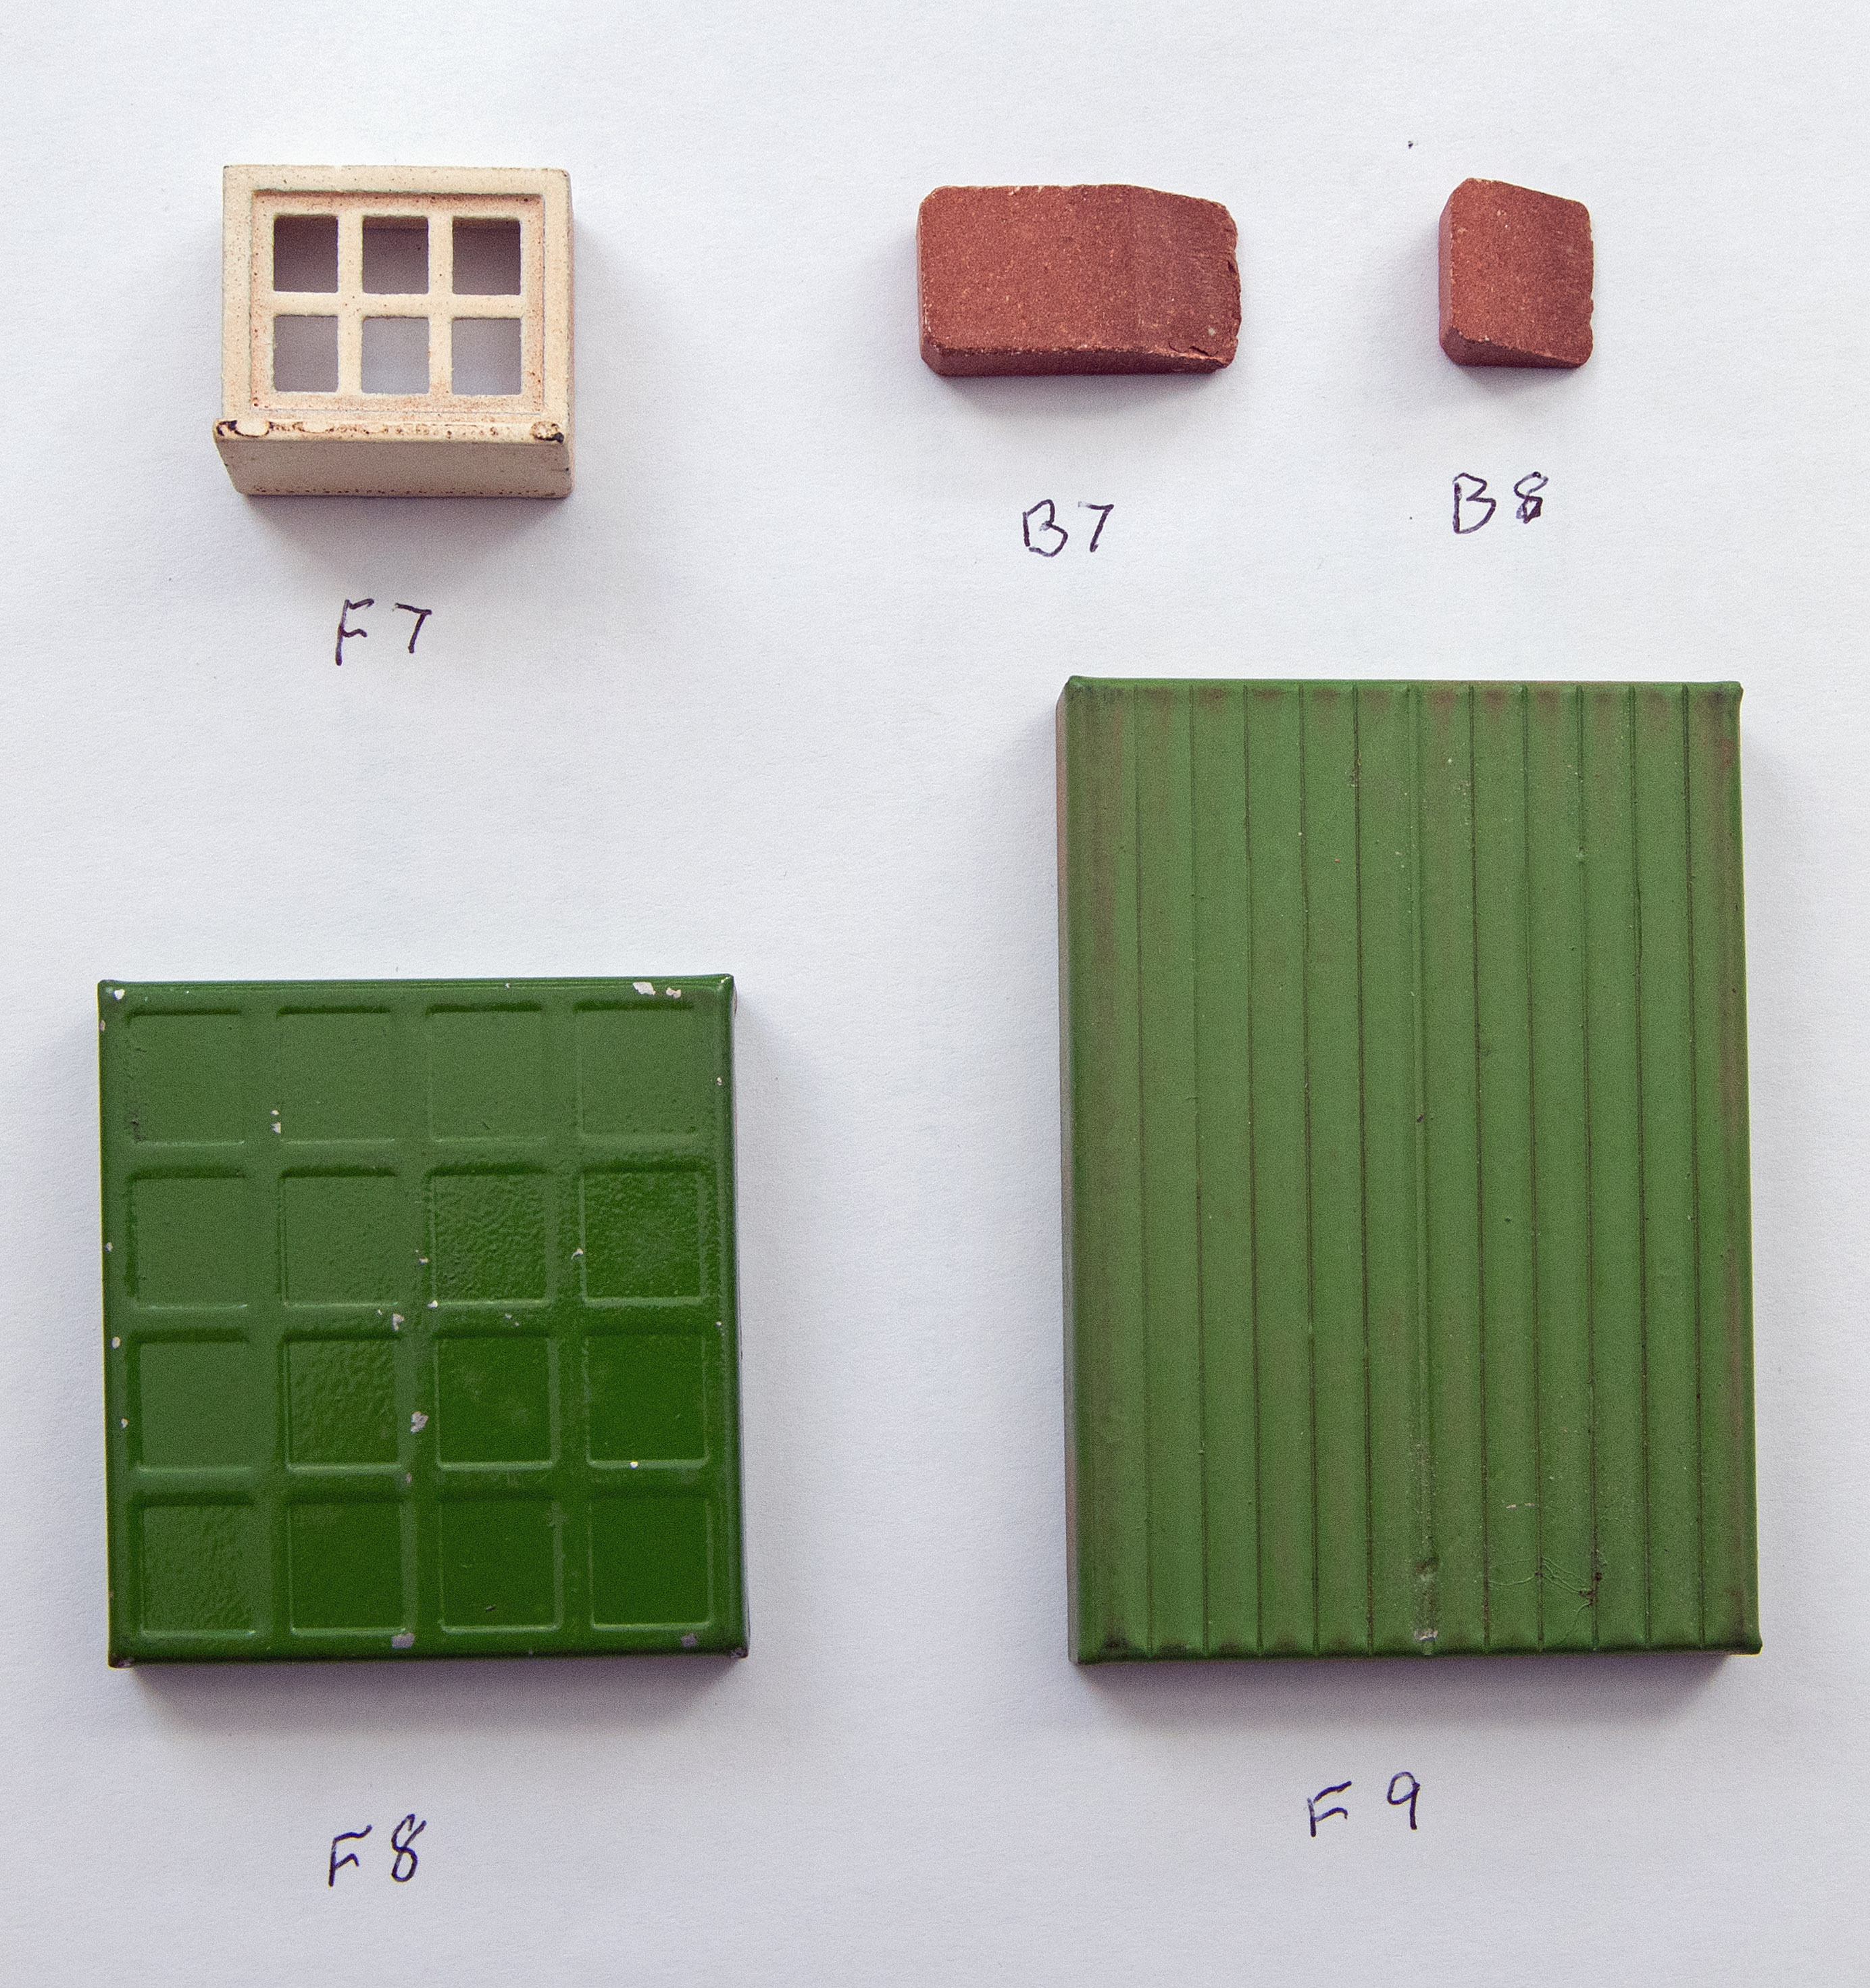
The Standard Brickplayer windows F1 to F6 are used, but the Farm Kit's F7 window also appears. The larger (garage) doors are a little different and coloured green. In the kits I have, these doors are solid, but perhaps Spears at some point changed to opening doors, like the F15 and F16 of the later Standard Kits 3 and 4.
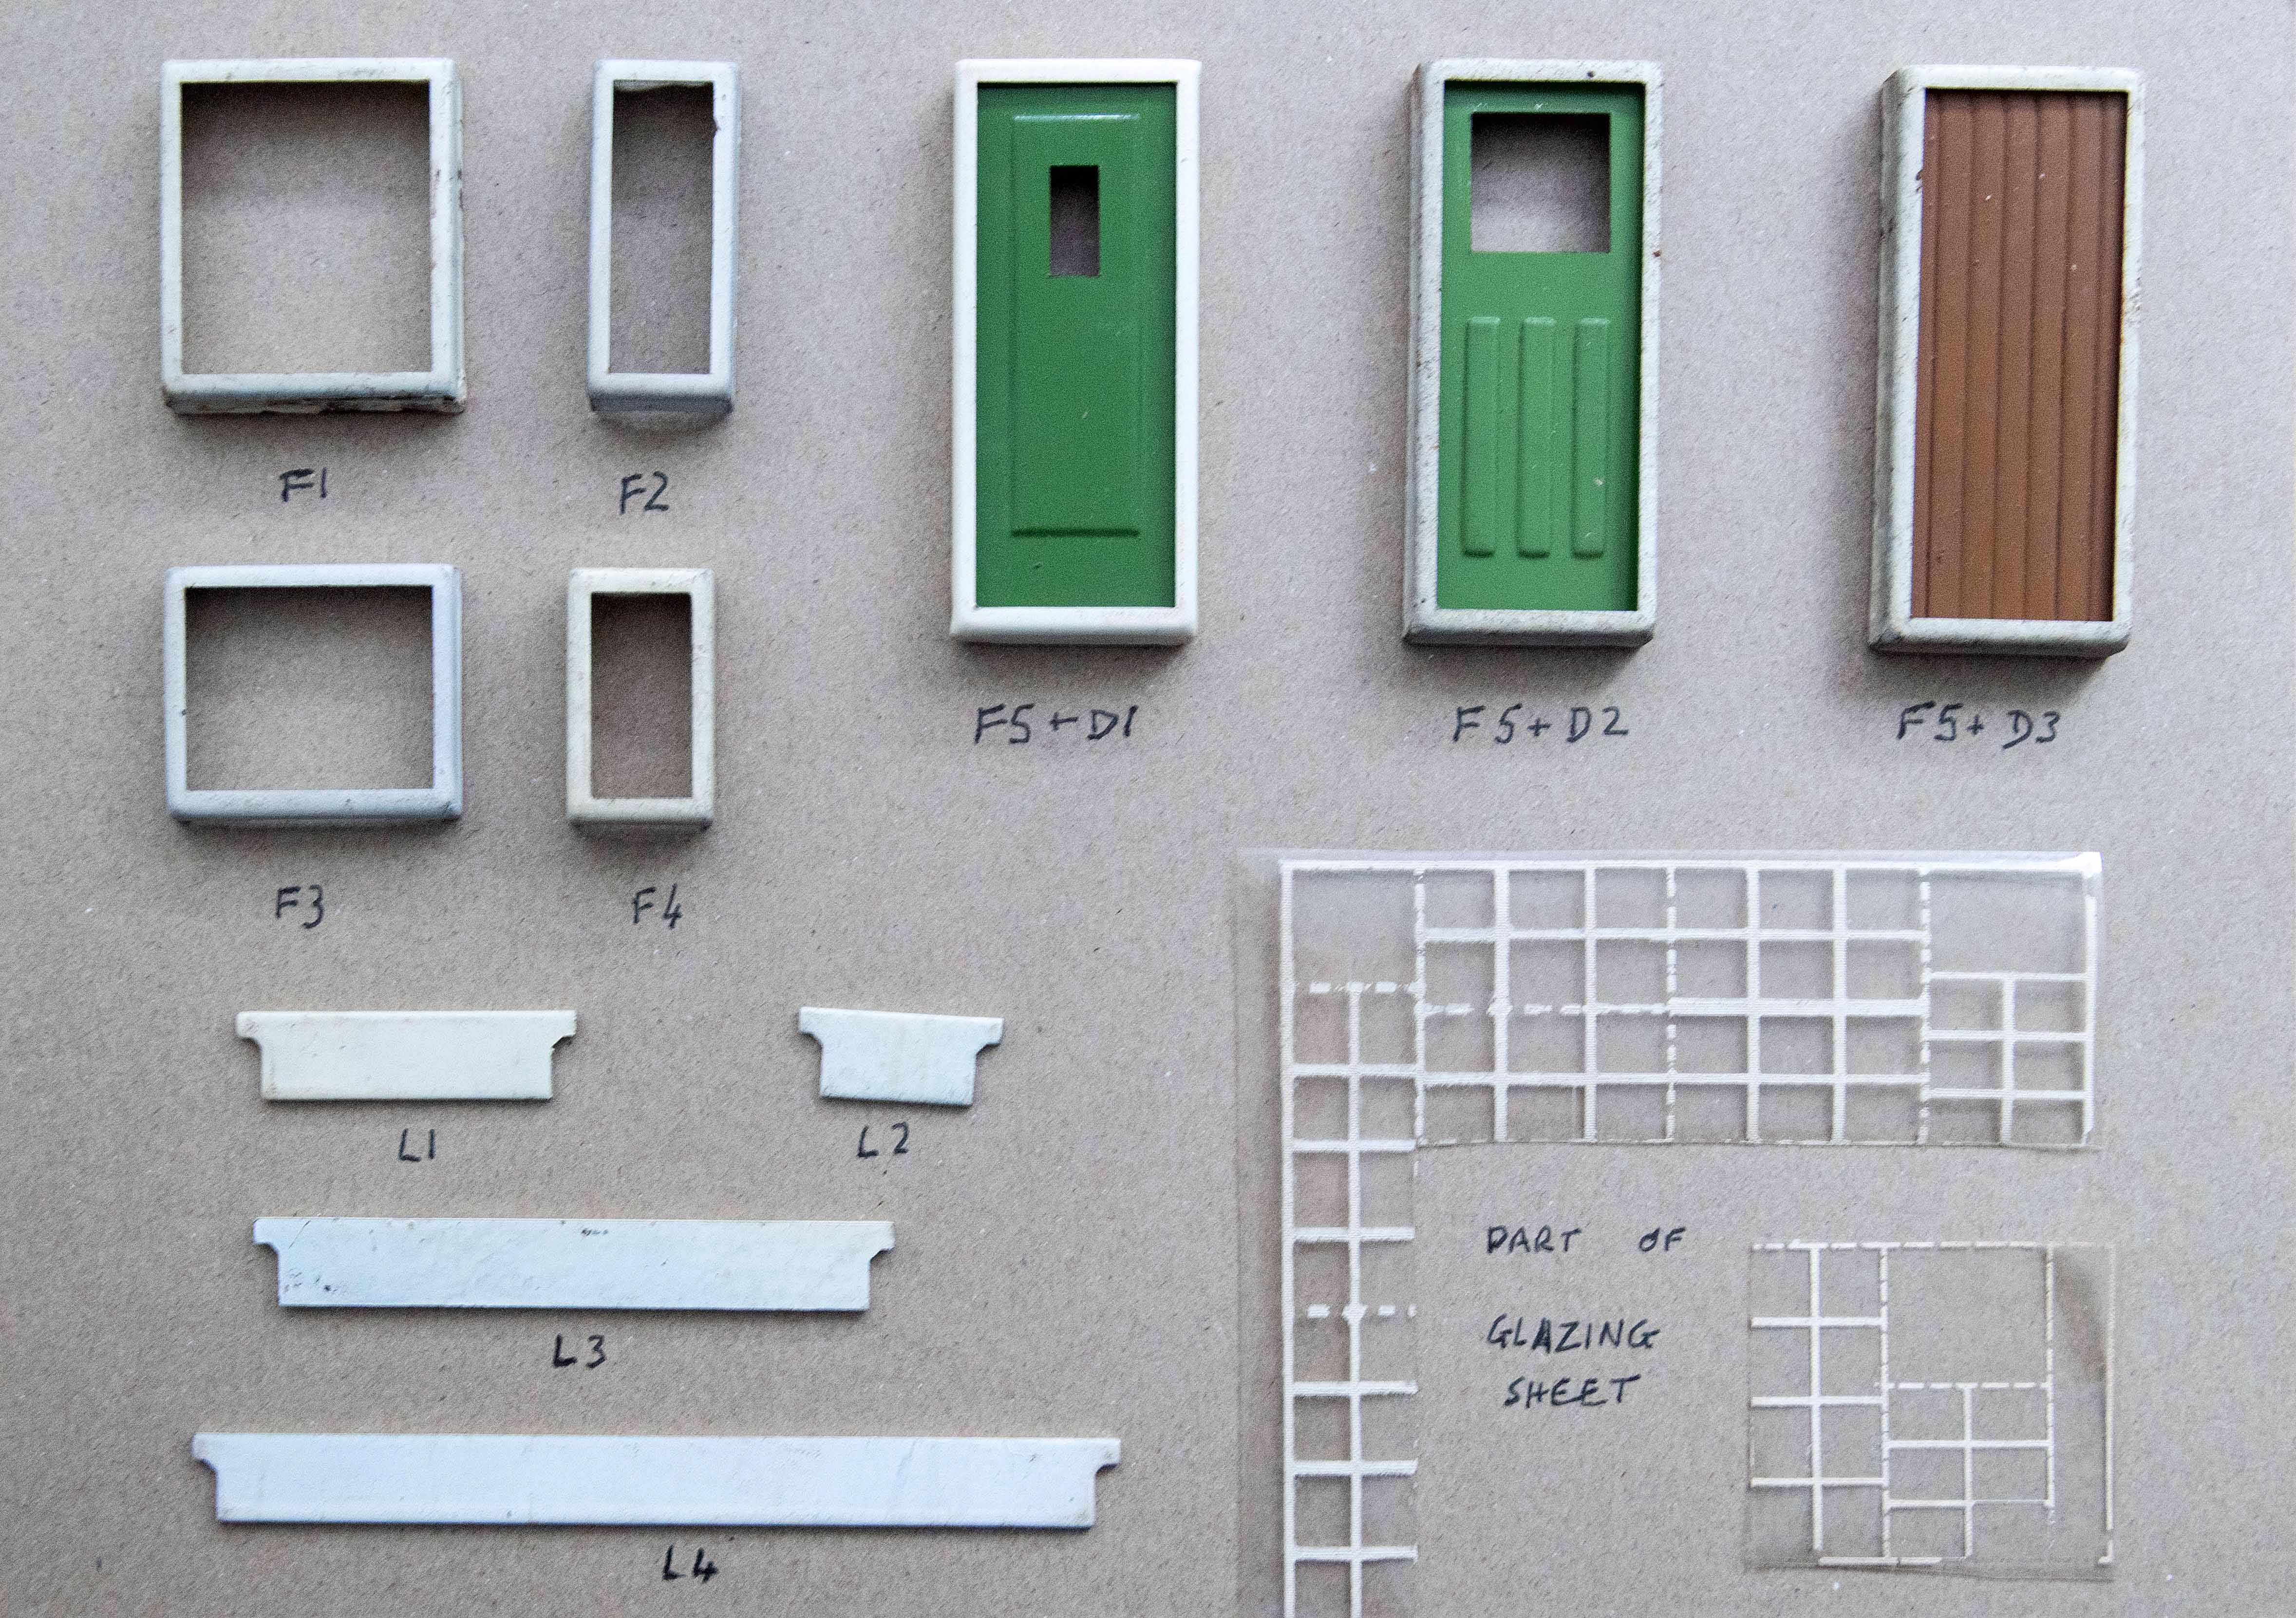
The images below are from an Early Brickplayer instruction booklet, and show the windows and doors. The door frame F5 is substantially larger than in Standard Brickplayer since it is at 1:27 scale. It scales up correctly to a regular door size in the building plans.
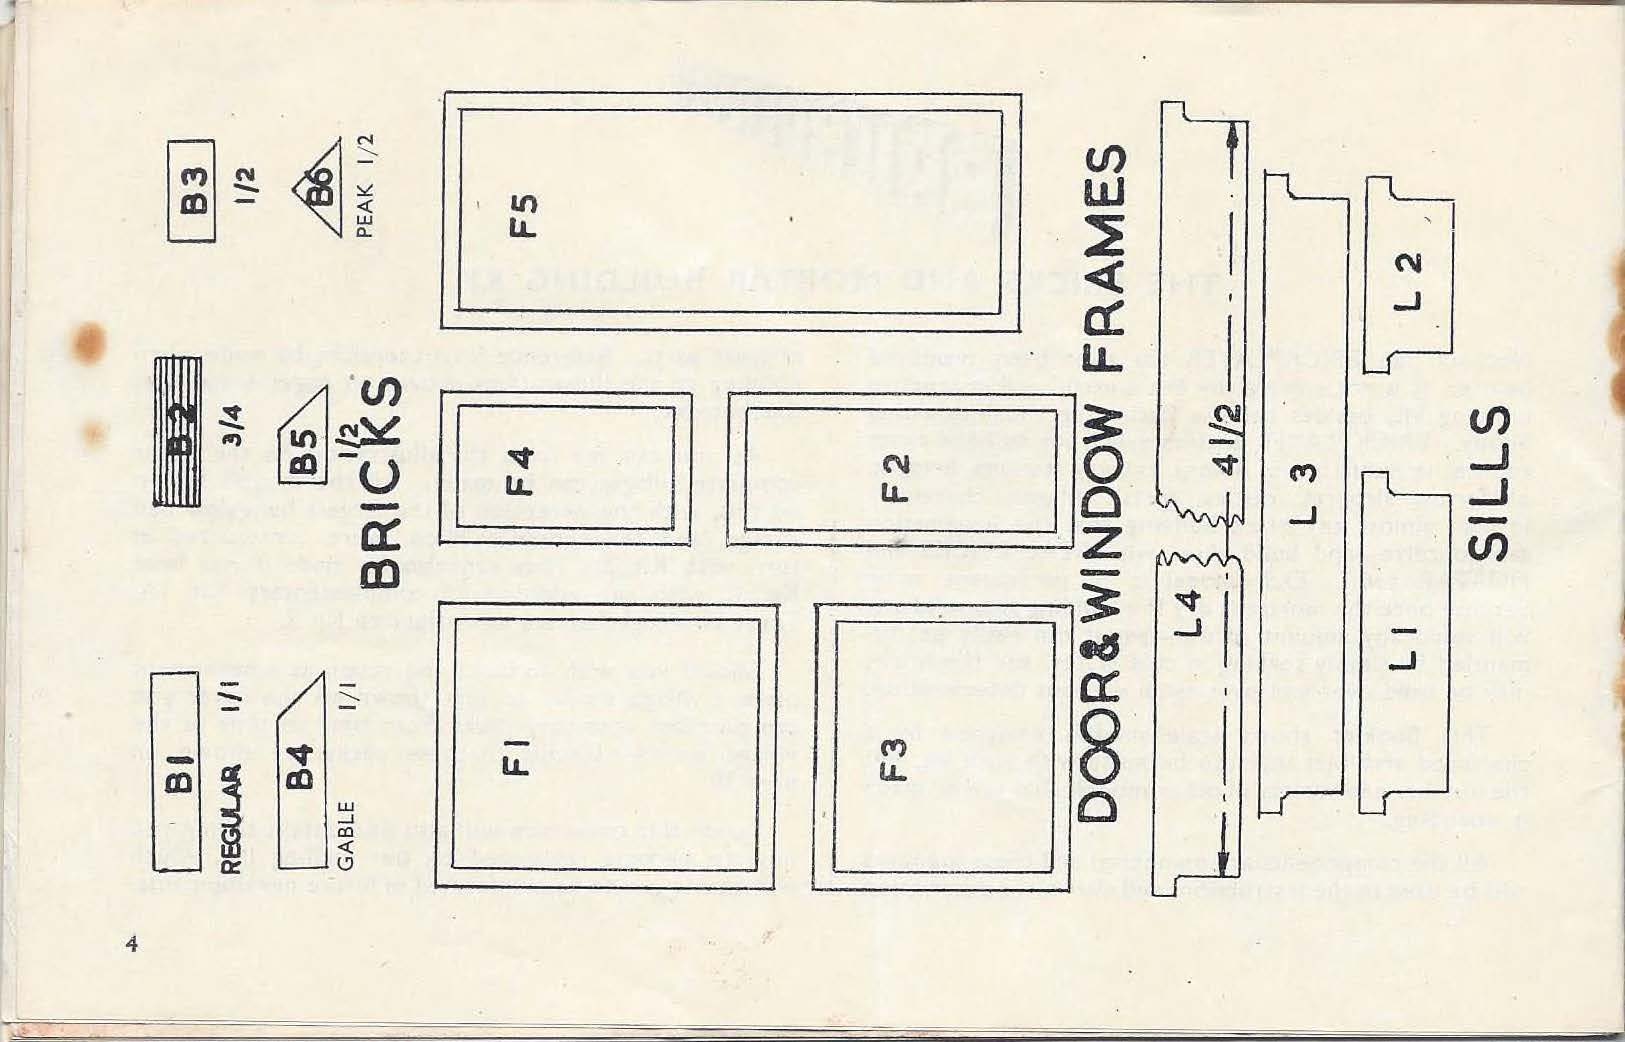
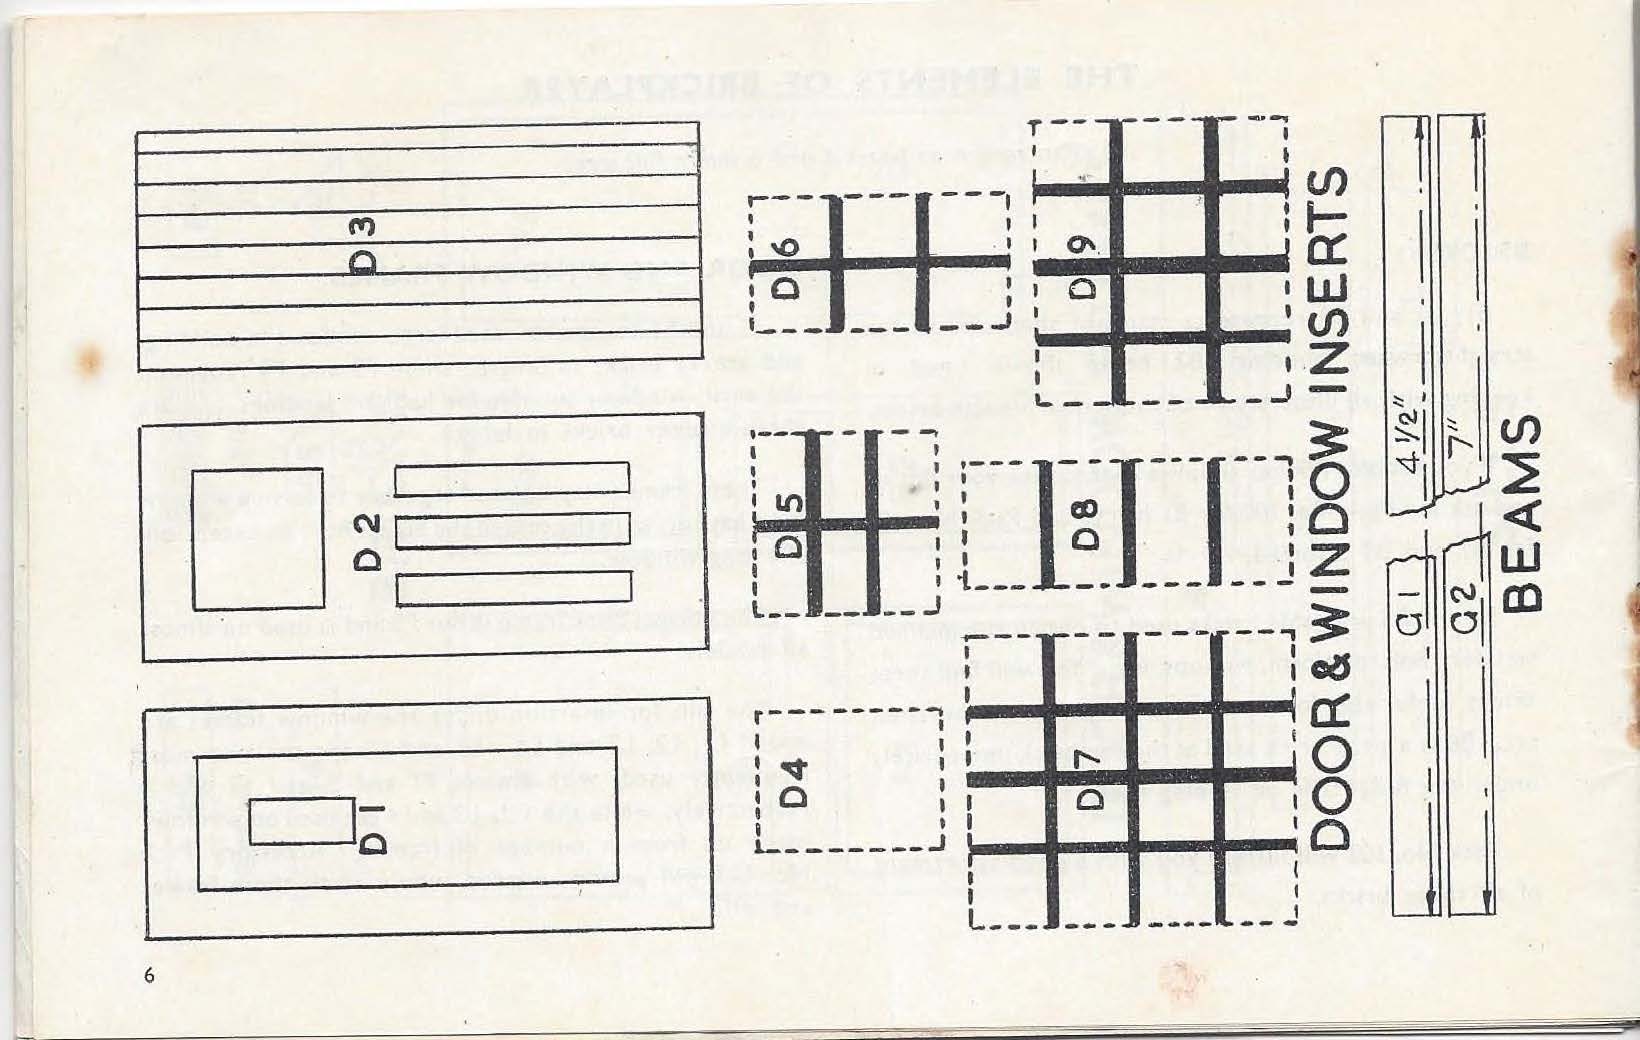
The frames were metal and three metal inserts, D1, D2 and D3, were provided to make different styles of doors. Notice that the D3 insert in the image below is brown, which may be more realistic for the style of door but all other instances I have seen of D3 are green. Window frames were plain metal rectangles. The window inserts D4 to D9 were printed on a transparent sheet of cellophane; they had to be cut out and glued into the frames. Different sizes of window sill, L1 to L4, had to be glued to the bottoms of the frames.
However, I have another Early Brickplayer instruction booklet (version 2), that shows an upgraded, more user-friendly form of window elements. The windows now have glazing bars (vertical and horizontal cross-pieces, also called mullions and transoms, respectively) and sills.
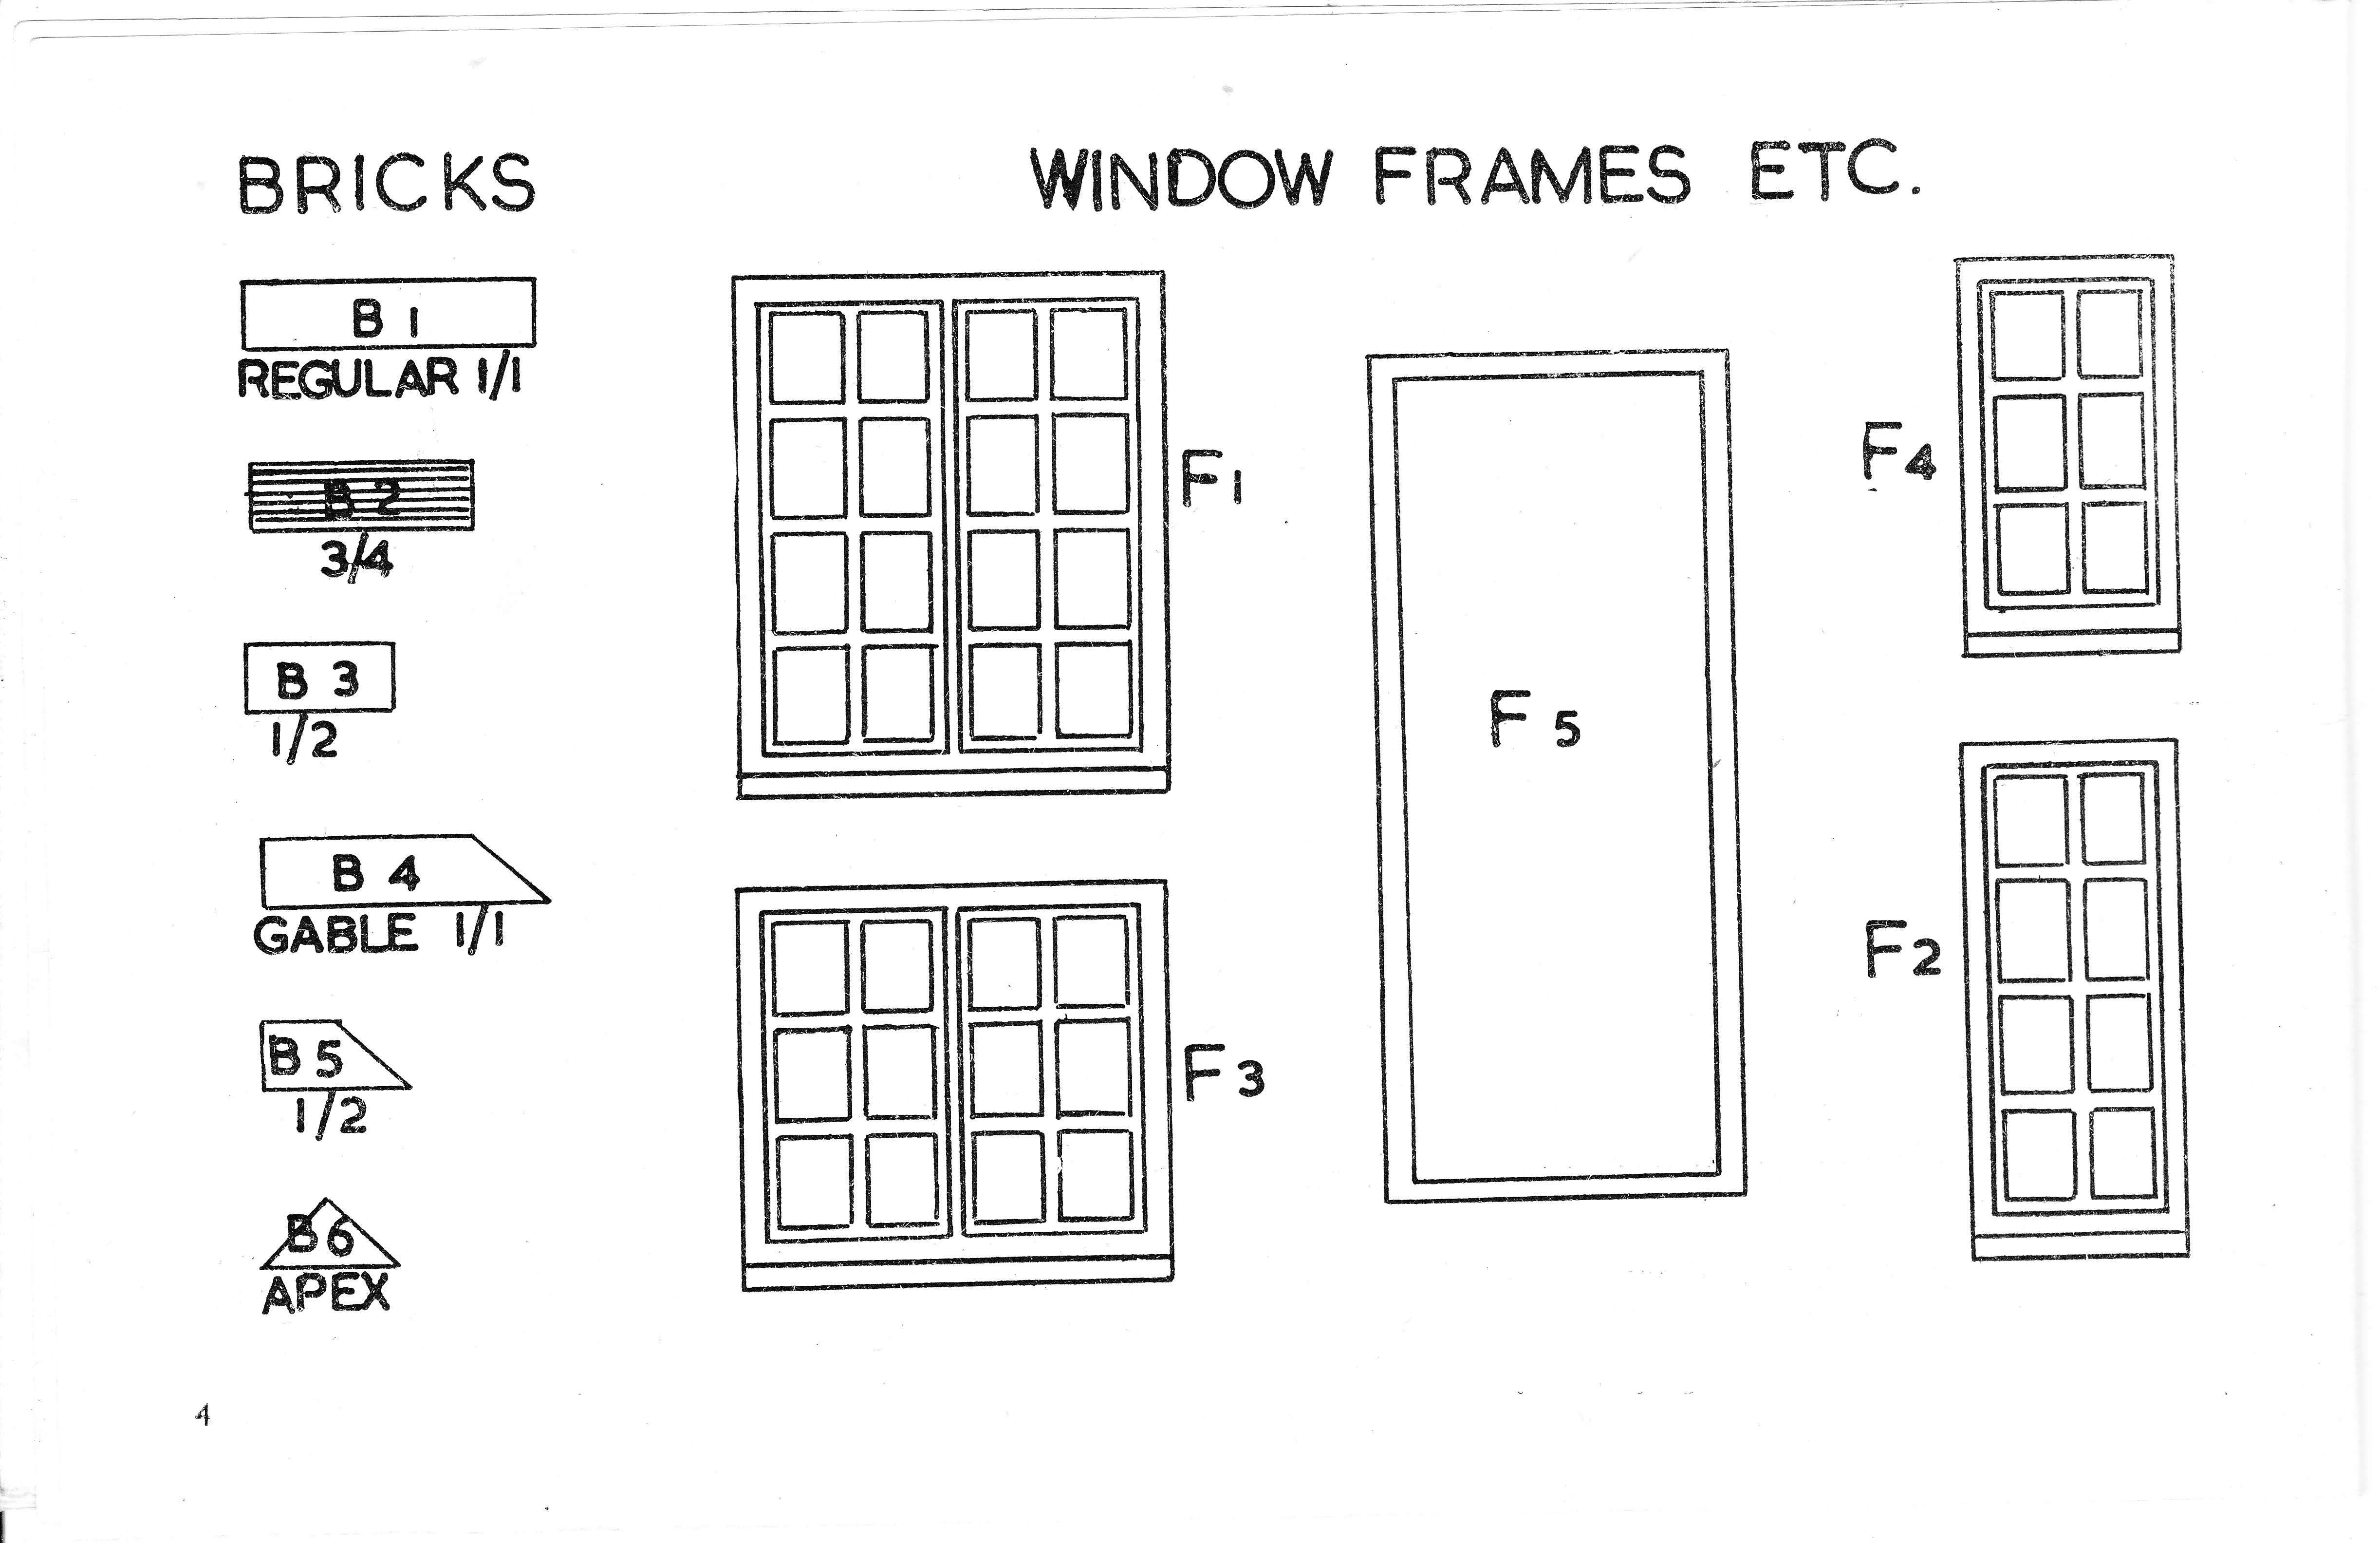

The window frames are now identical to the F1 to F4 in Standard Brickplayer. They are still meant to be scaled 1:27, so would in effect be smaller in the scaled-up buildings than the Standard Brickplayer windows. In the 1:48 scale of Standard Brickplayer F1 to F4 create larger windows, and the smaller F6 was introduced. (Incidentally, it seems that the use of F to identify the windows and doors arose in the very earliest kits because they were literally just frames. The F was retained in Standard Brickplayer even though they were now fully modelled windows and doors.)
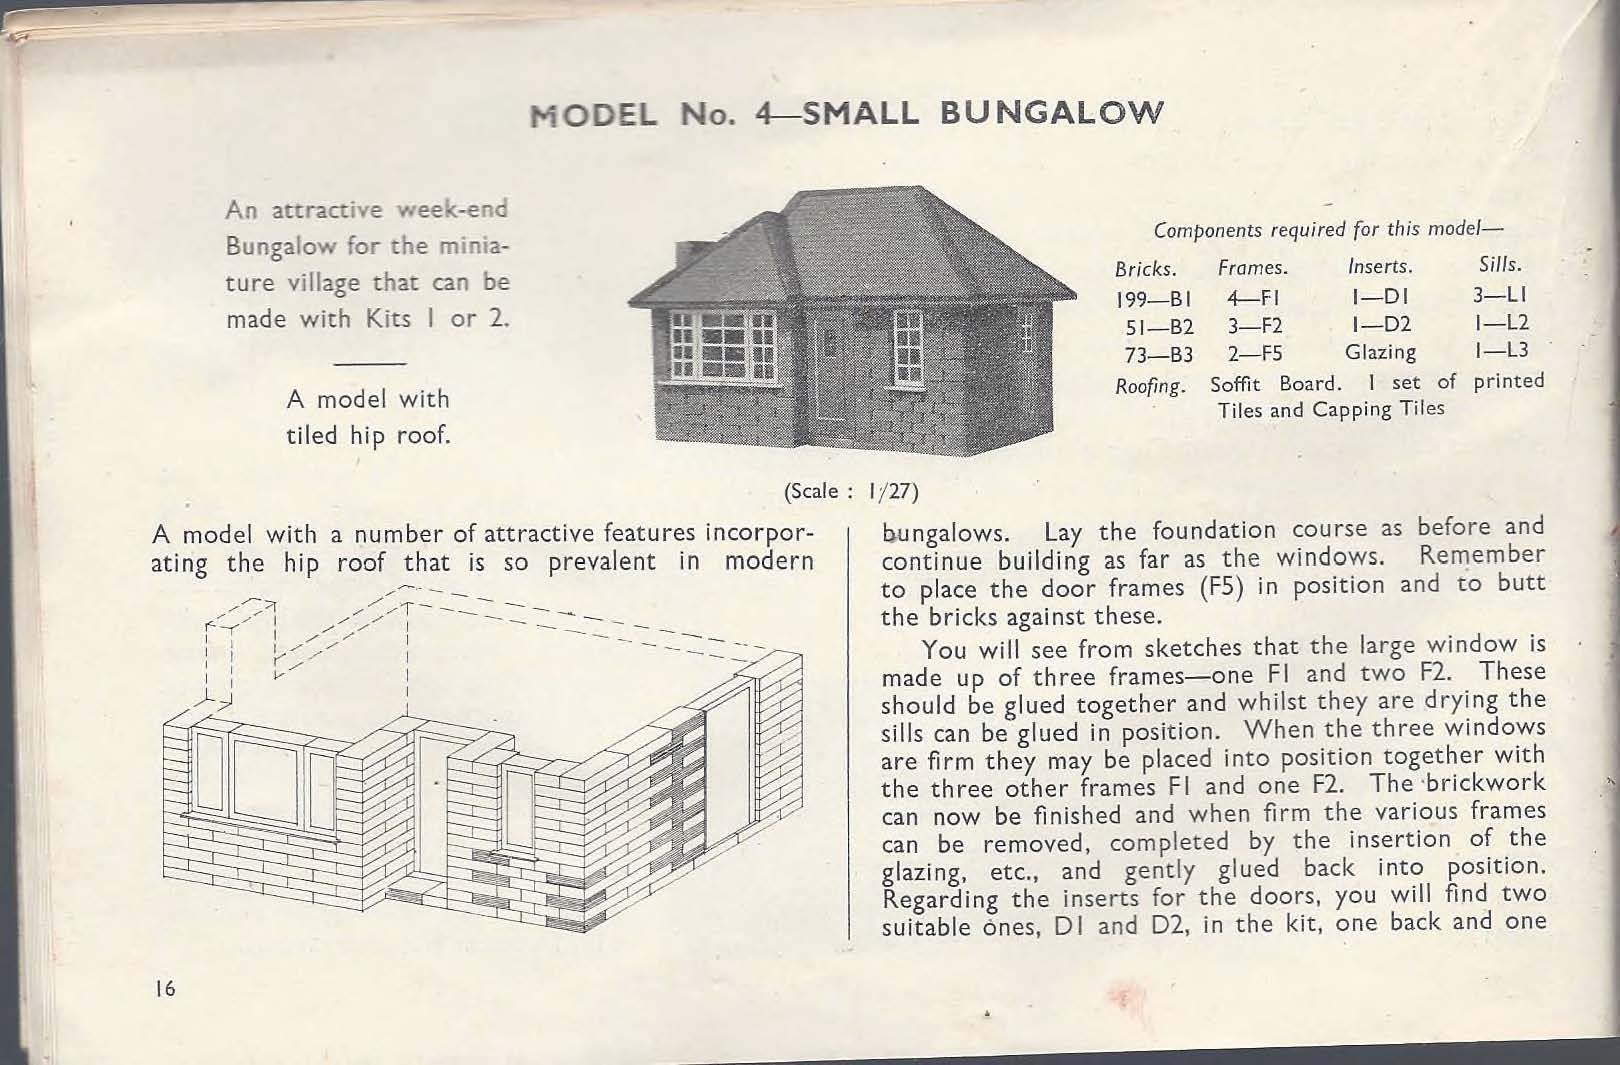
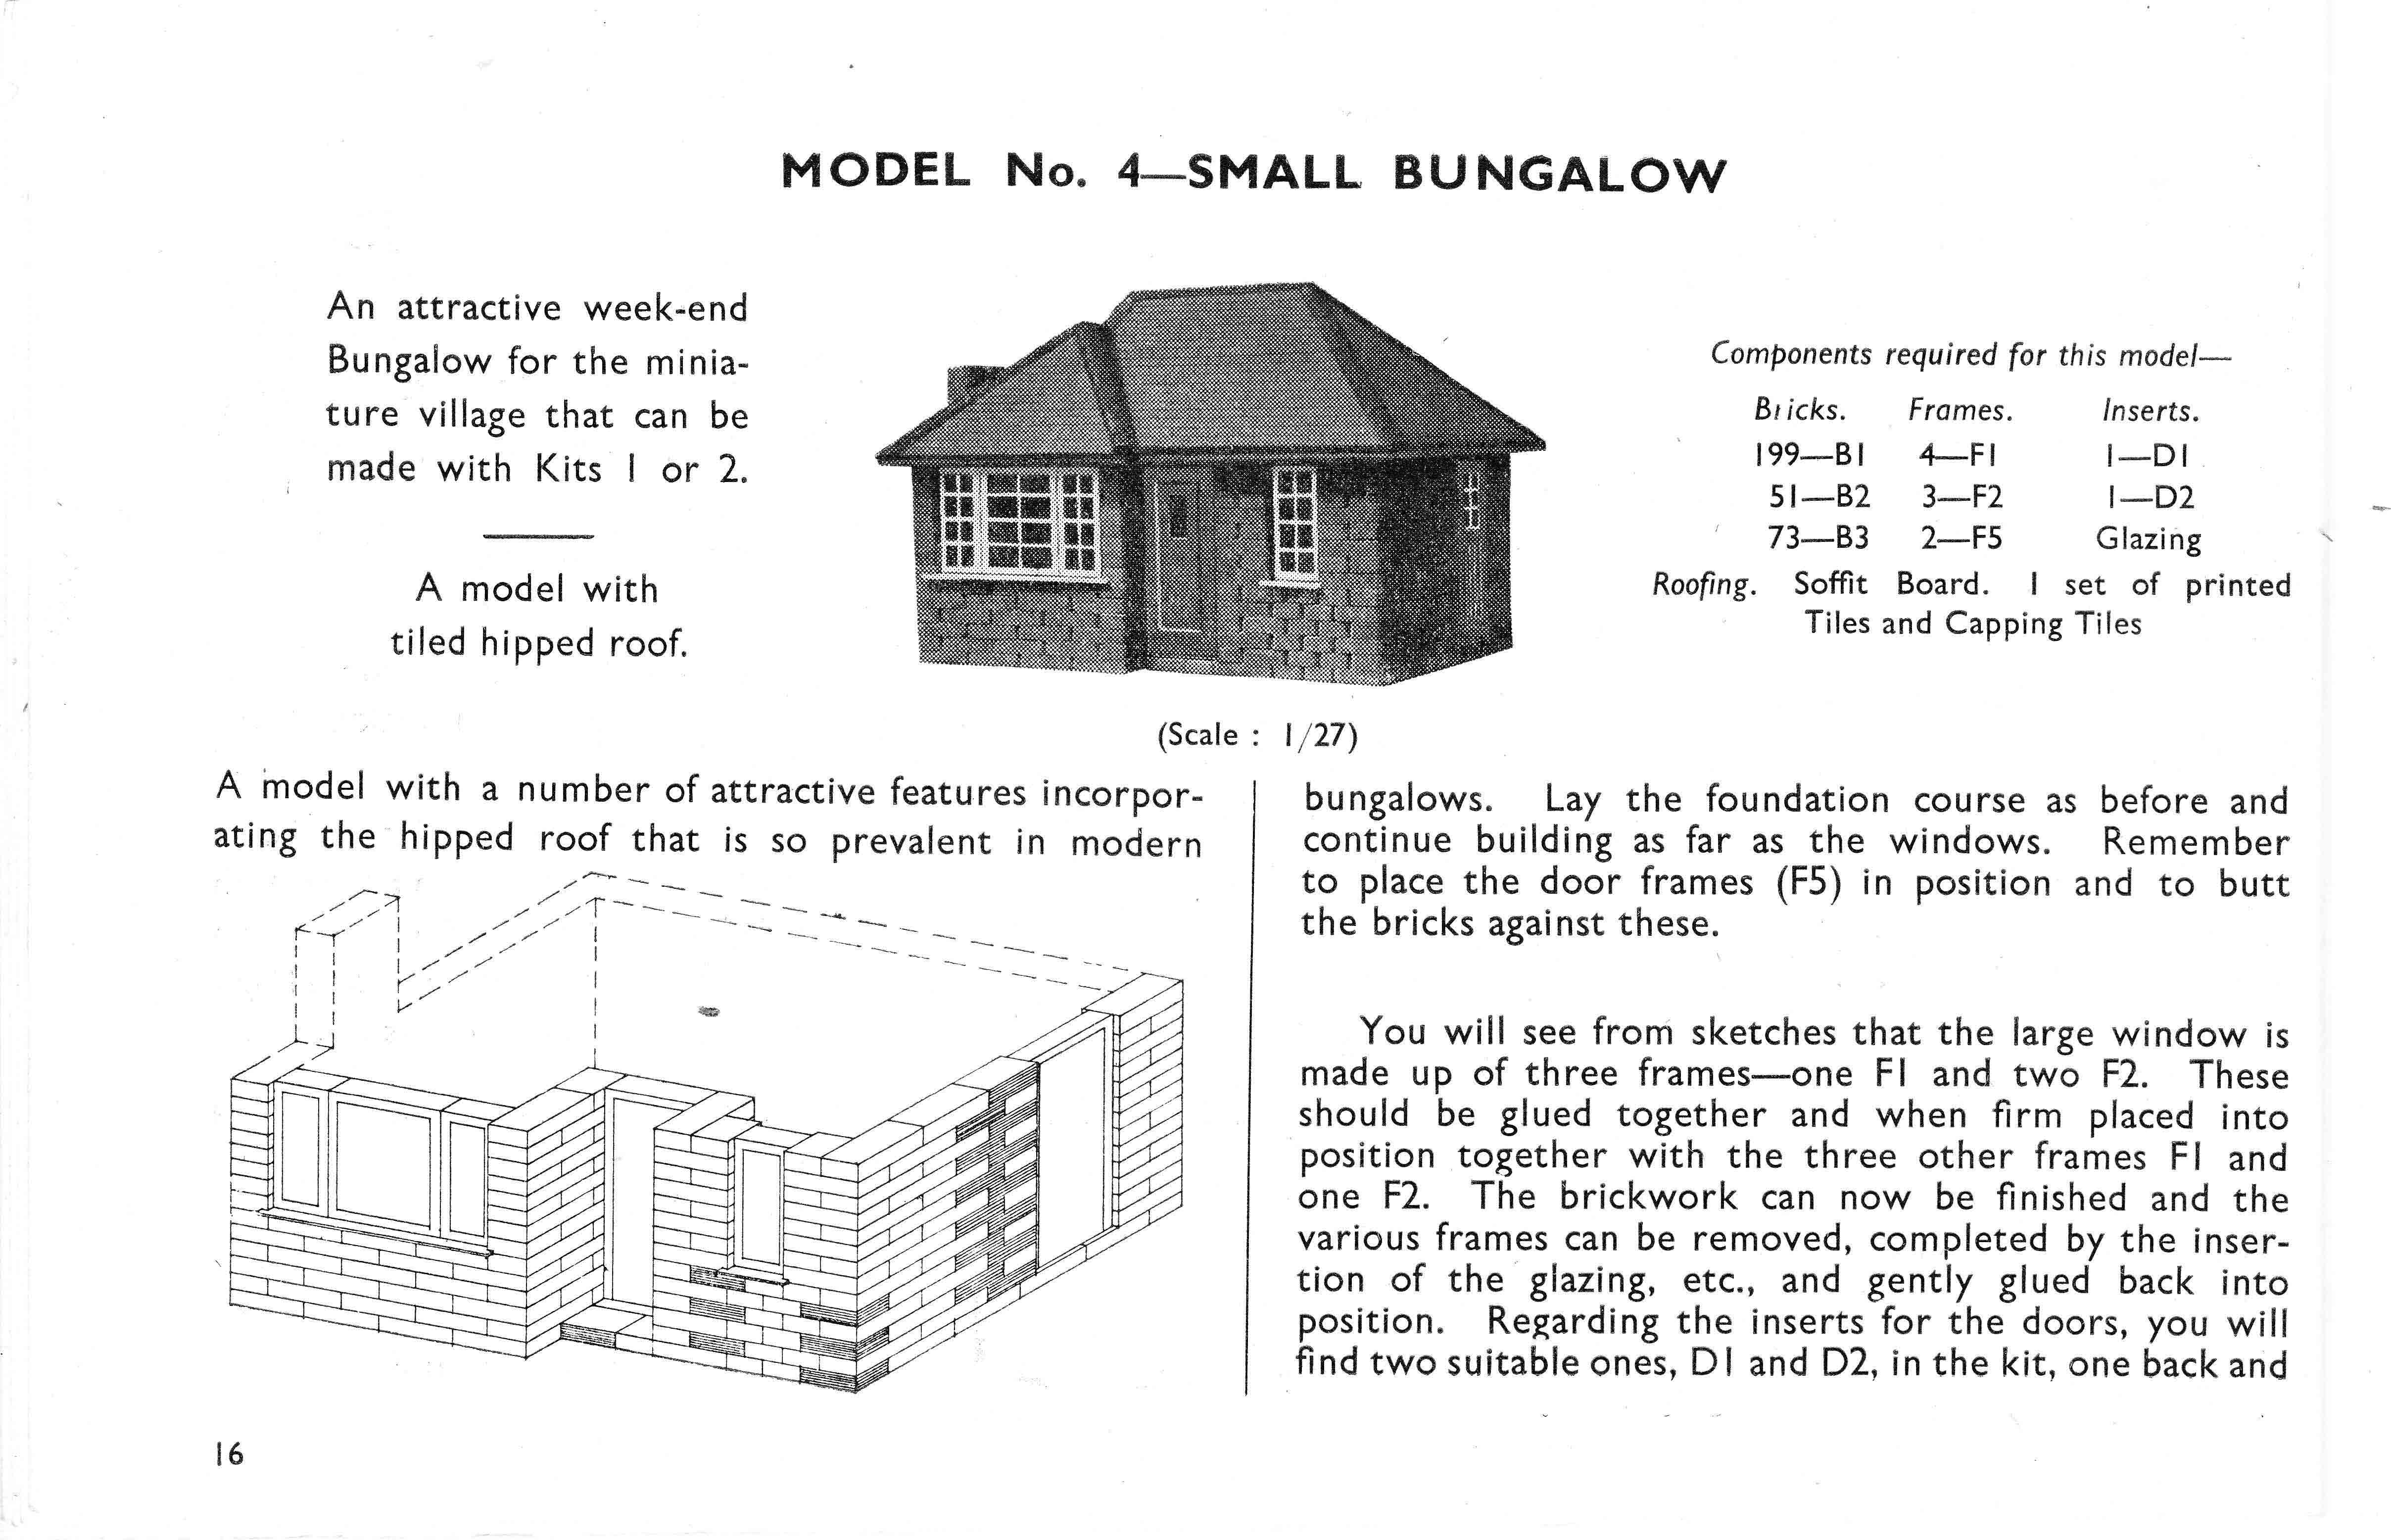
The two instruction booklets provide instructions for the same 8 models, modified only by calling for windows to have separate insert and sill components in the first version. The images below are interesting because they show those differences. The list of parts in version 1 calls for the window sills, while in version 2 they are not needed. The image on the left clearly has version 1 windows because the sills project to the sides - the later version 2 windows have sills attached but they are only as wide as the windows themselves. However, the inserts of the F2 windows have vertical glazing bars which do not match the D8 inserts shown in page 6 (above) for that window size. I believe that the page 6 version of D8 in version 1 must be wrong.
Notice, however, that the pictures of the model are identical in the two versions (and this is the case with all the models). In particular, the version 2 picture shows windows with projecting sills. It seems that Spears have not bothered to create fresh pictures when they upgraded the window elements.
There were no window or door frames. Instead, these sheets of printed window and door cutouts were provided on thick card.
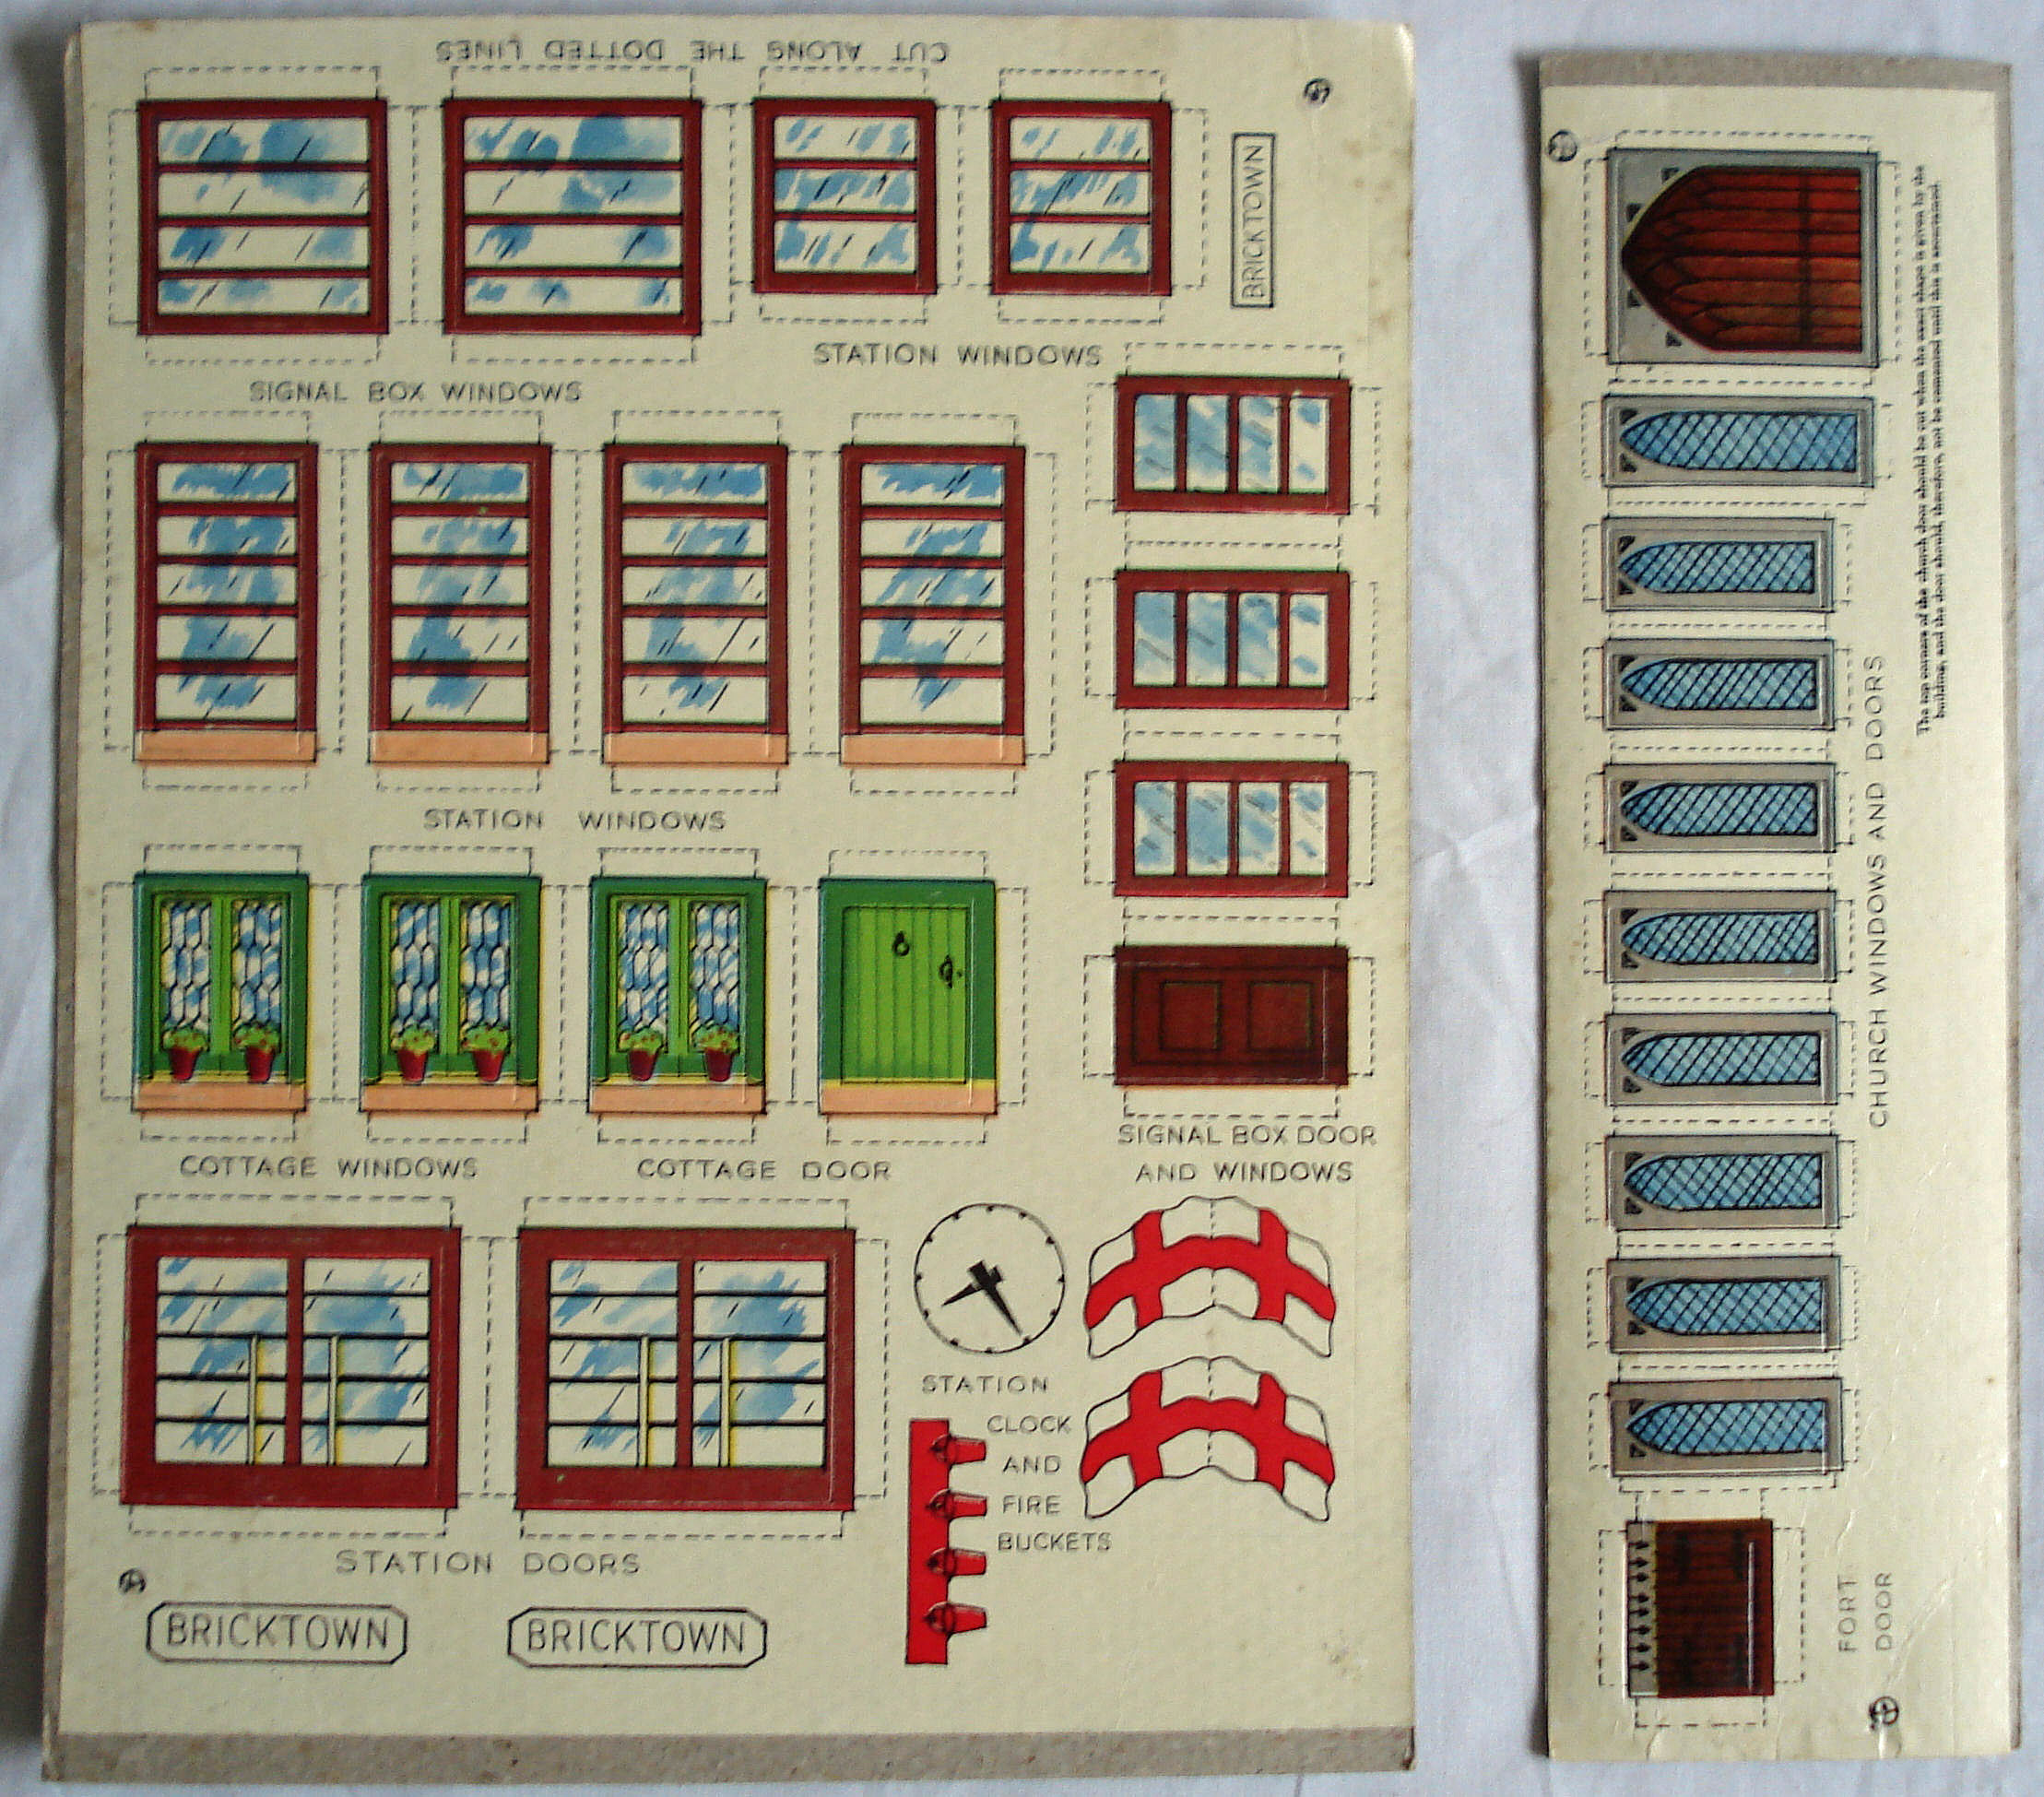
The left hand sheet was supplied with Kit B5, providing doors, windows, etc. for the three models to be built with that kit - the Cottage, Signal Box and Railway Station. Kit B7 additionally had the right hand strip, for the Fort and the Church. The relevant pieces were simply cut out, the flanges were turned back and they could then be simply pushed into spaces between bricks. If necessary, they could be glued into place. See the Pre-war Brickplayer page for some models showing these inserts.
Kits were supplied with only enough of the elements to make one or two models. That is, for each type of brick, window or door, there were just enough in the kit to build whichever model needed the most of that element. The exception was the Farm Kit, for which sufficient windows and doors were provided to build all the models, but the owner would still need to buy a special accessory pack of bricks that would then allow the entire farm to be built.
However, since the other components, such as roofing, were not reusable, kits always provided enough of these other components to make all the models in the instruction book.
Early Brickplayer used sheets made to look like a rather more realistic dark red tiling (although I have some that are more brown than red). For buildings with hipped roofs, some tiling sheets were marked up so that pieces could be cut out to exactly the right size to be assembled into the roof. Where buildings had simple gable roofs, rectangular pieces neeeded to be cut out to the specified sizes from unmarked tiling sheets. Thicker concrete roofing sheets were precut to size, and where two or more pieces were to come from a single sheet, the sheet was partly cut through. These are just like the pieces found in one of the Pre-war kits, so it is likely that the brown pieces in the other Pre-war kit were earlier, perhaps actually pre-war.
Standard Brickplayer also used tiling and concrete sheets, but now pieces for even the simpler roofs were marked out on the tiling sheets. Thus, Kits 3 and 4 contained sheets of roofing tiles labelled A to E (Kit 3 only had A, B and C) printed with the outlines of the various pieces of roofing for the different models.
American kits had some pieces representing wooden clap-boarding, to be used for a gable end on model 3 in the instruction book.
In Contemporary Brickplayer the dark red tiling was replaced by a, presumably more modern, style called pantile roofing, in a brown colour. In addition to concrete roofing, Contemporary Brickplayer also made quite extensive use of a metallic grey style called aluminium roofing. It also had some small pieces of printed paper representing timber cladding, that was to be glued to the sides of some buildings.
Thinner strips of wood in the Kit 4 were used to create fascias that would disguise where a gable was built without the sloping gable bricks. This allowed a roof to have a different pitch than the regular gable bricks produced - see models 8 and 9 in the instruction book.
Soffit boards, printed to look like wooden floor boards, were provided for some buildings, particularly where there was a hipped roof. The soffit board was laid over and glued to the tops of the walls, and the roof was then glued down to the soffit, using tabs turned under. The soffit projected slightly out over the walls, creating a realistic effect of the roof overhanging the walls.
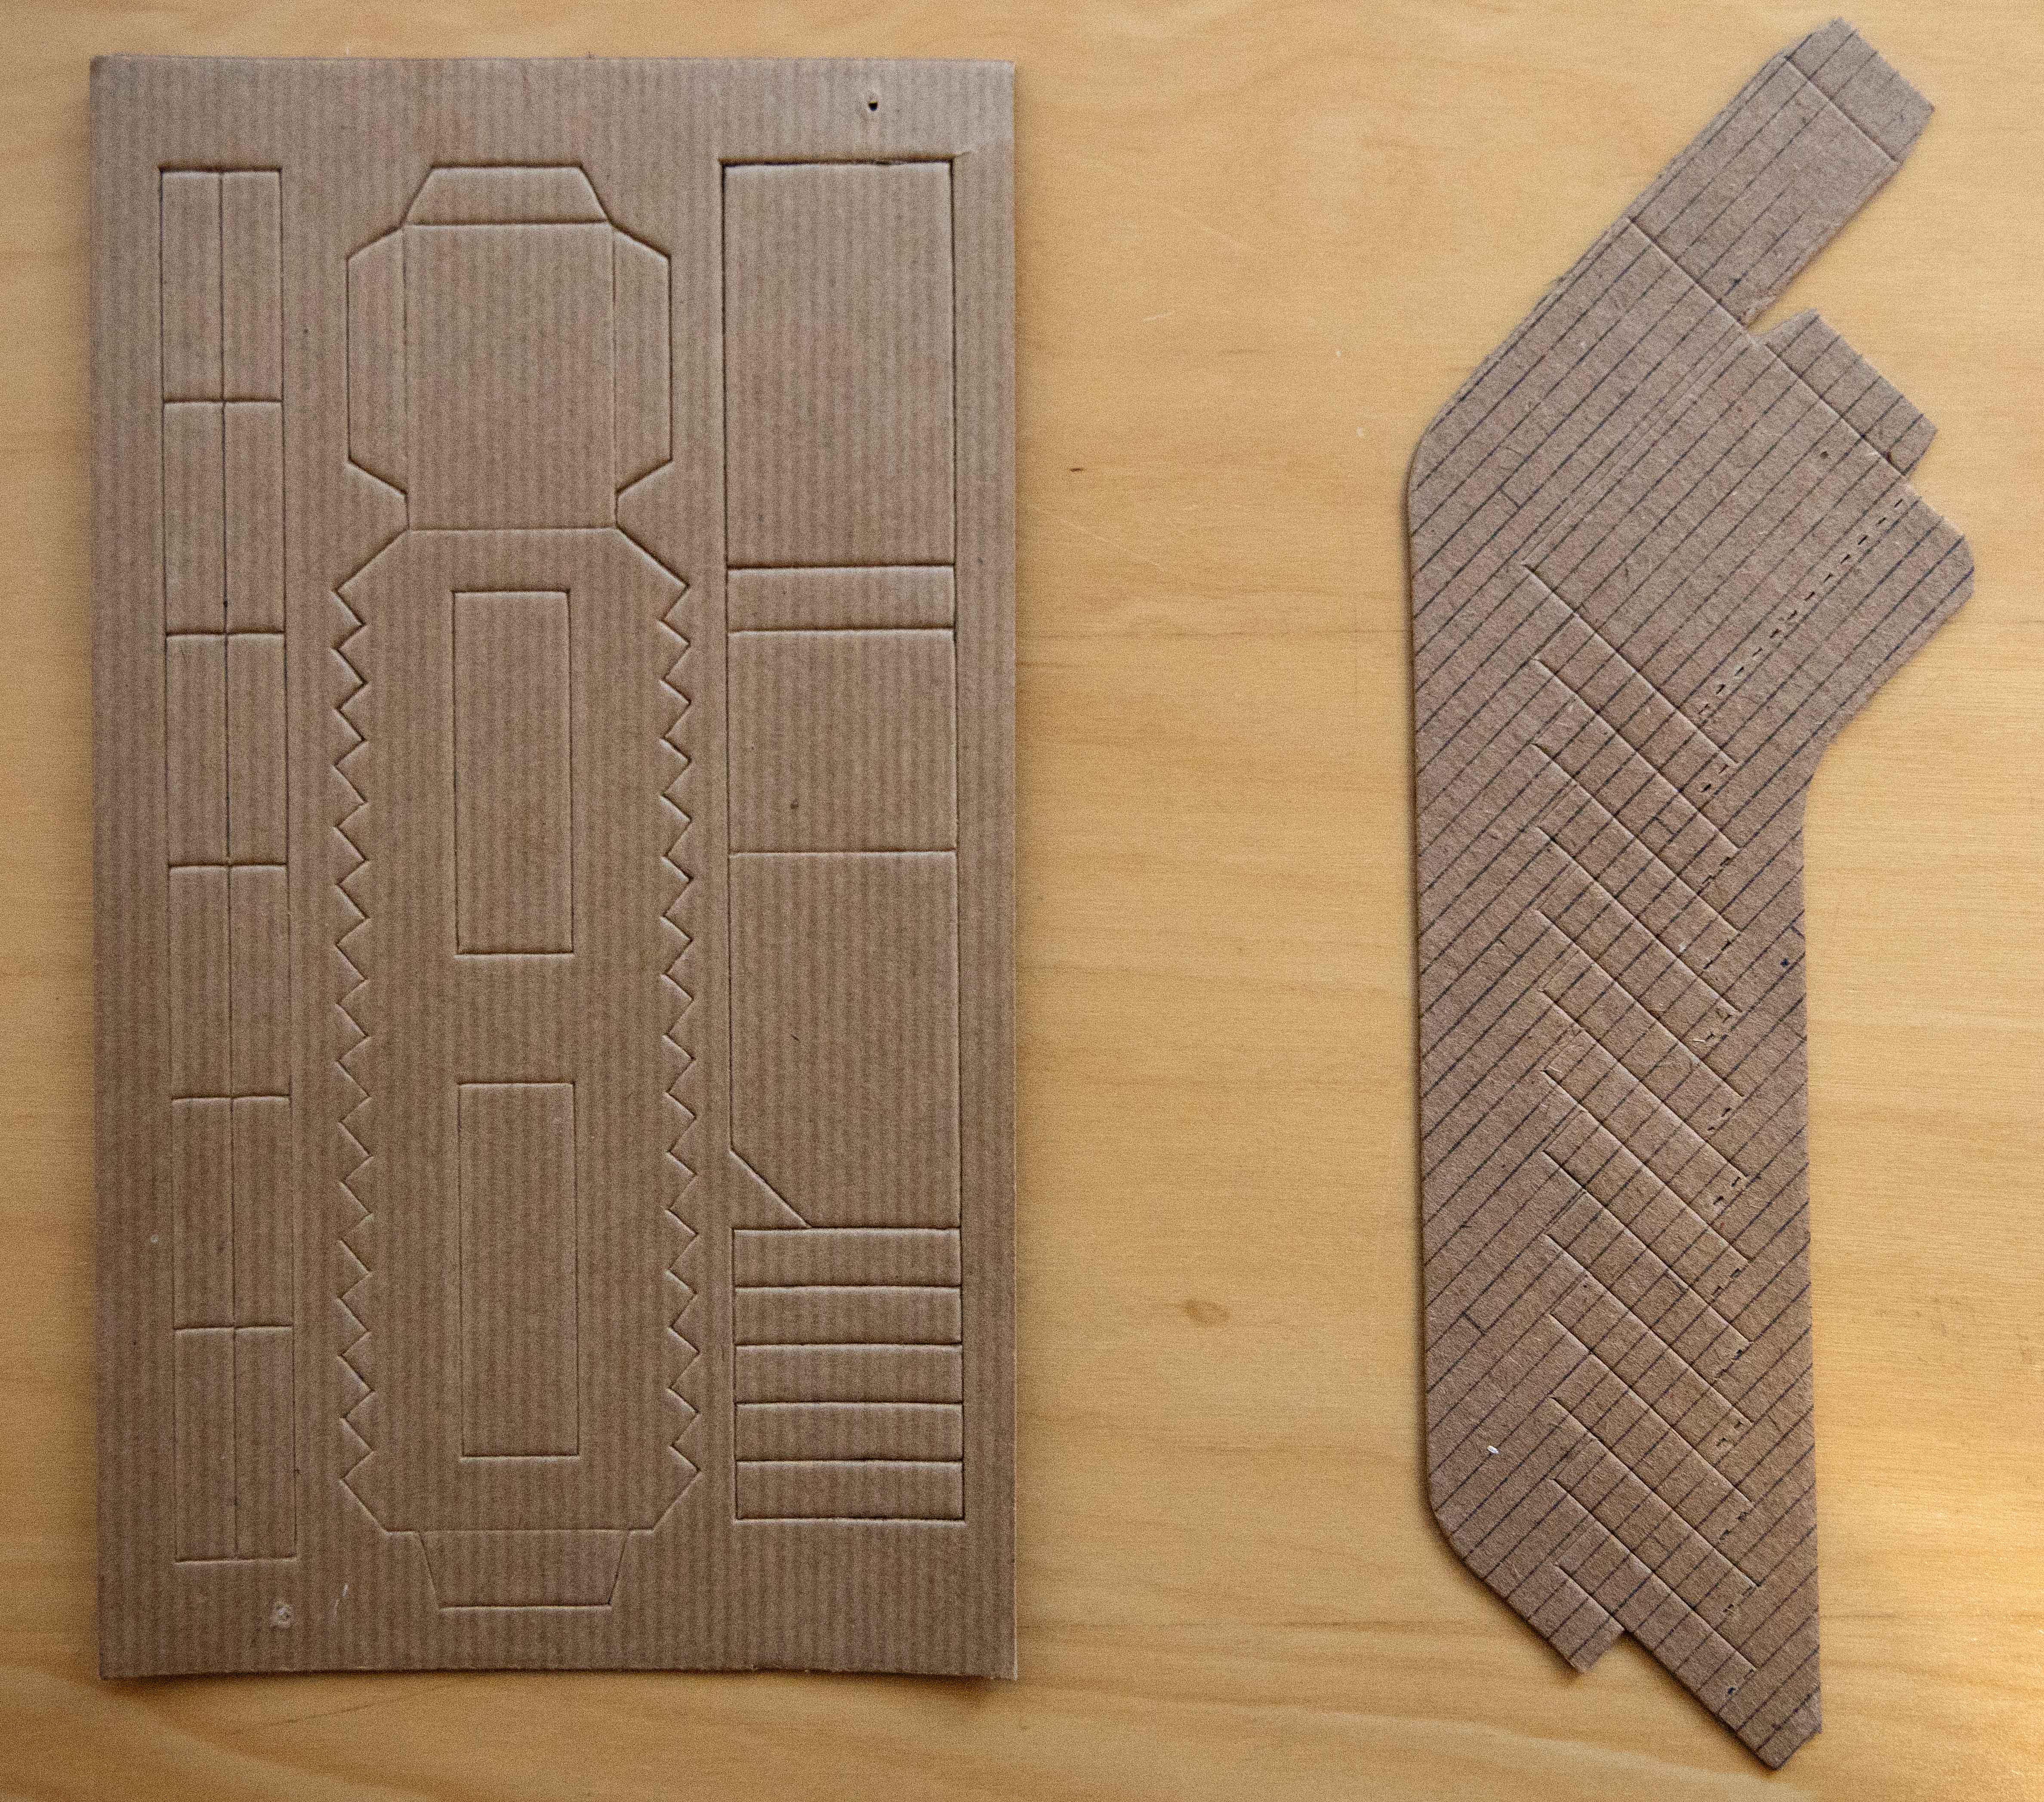
On the left is the earlier version, with the later version on the right. Instructions for constructing them are shown in pages from their instruction books below. The earlier version was much more fiddly to build, requiring each tread to be separately glued to the sides.
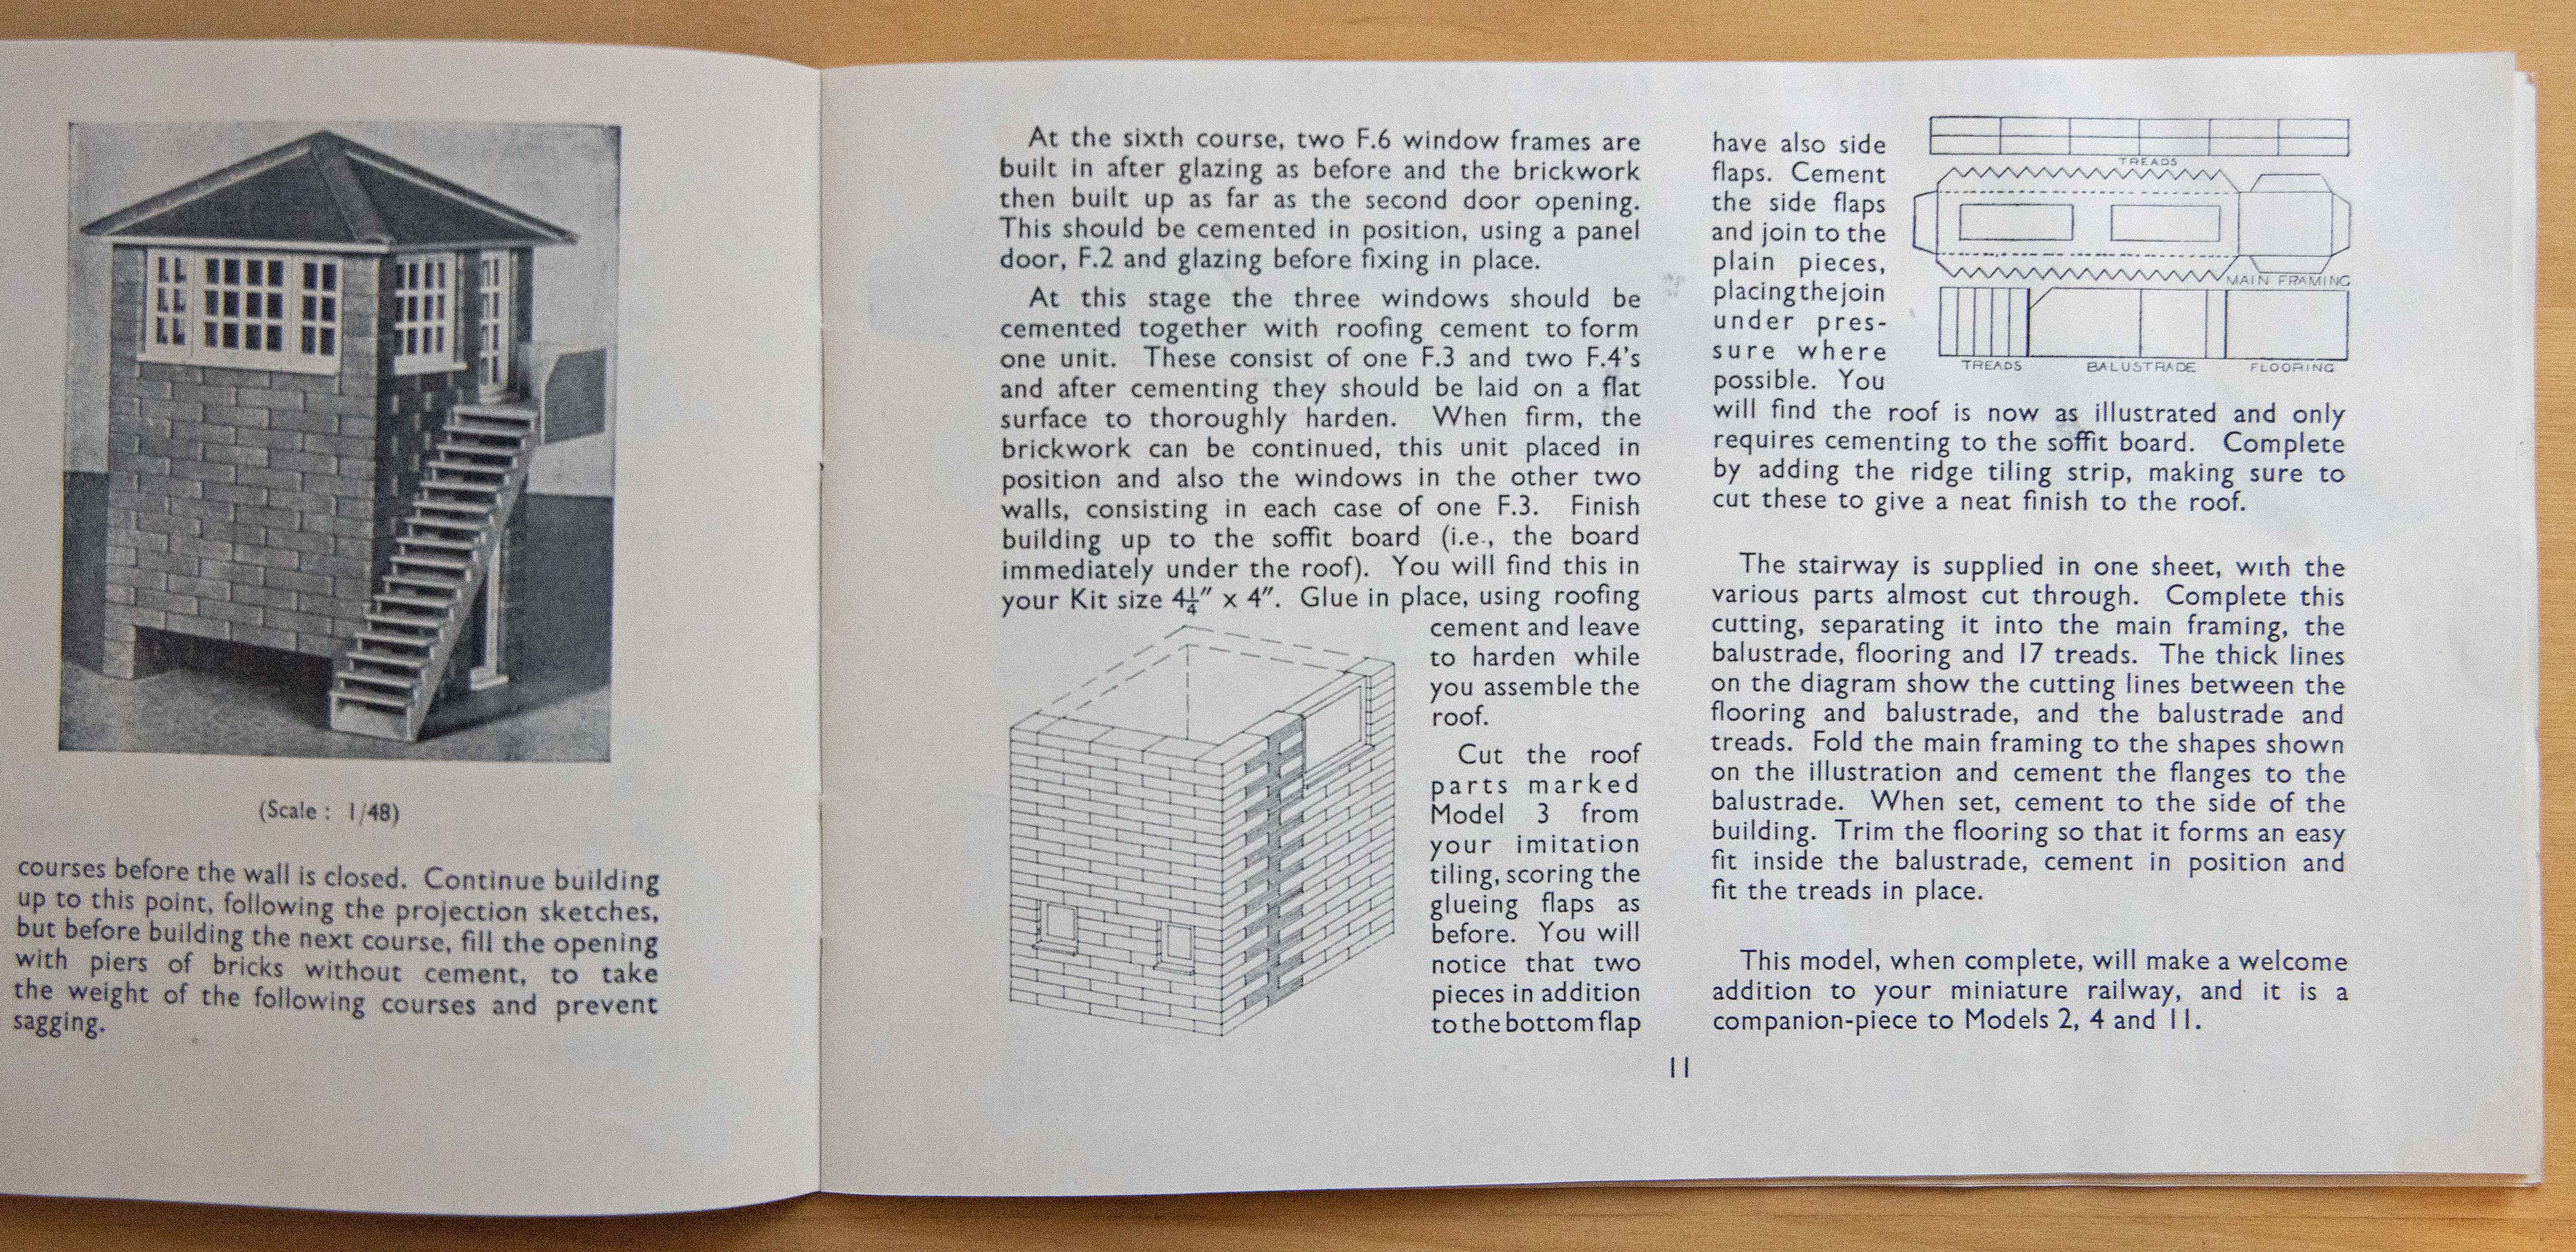
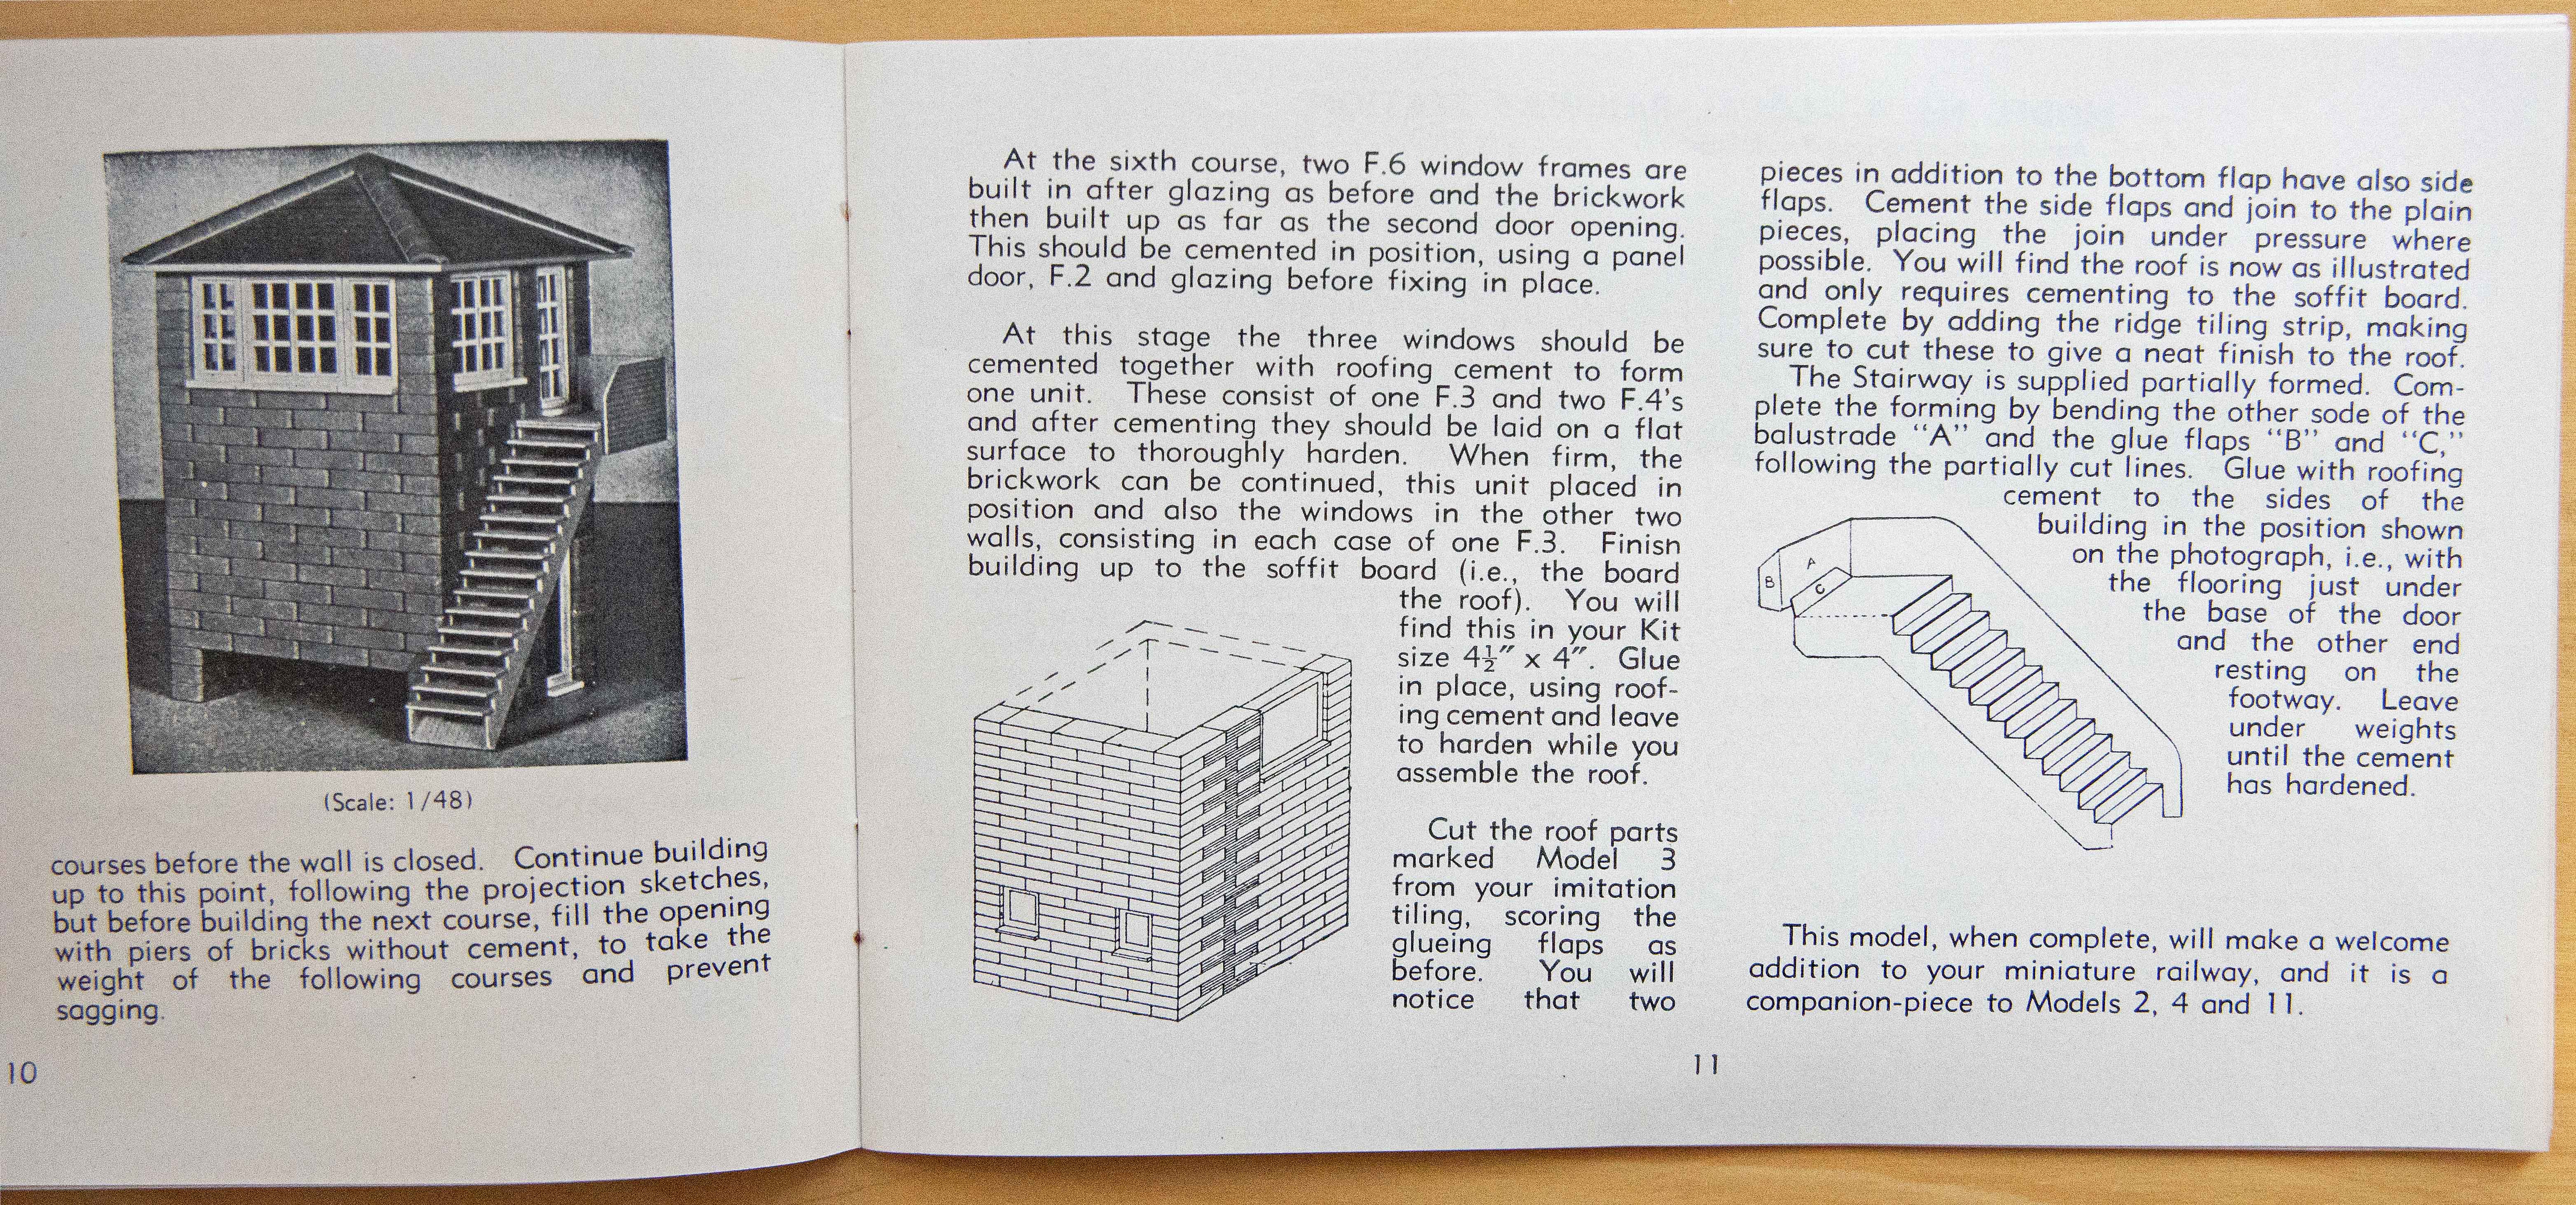
Notice, however, that the picture of the completed signal box is the same in both instruction books; the second version of the staircase would not match the picture in its instruction book!
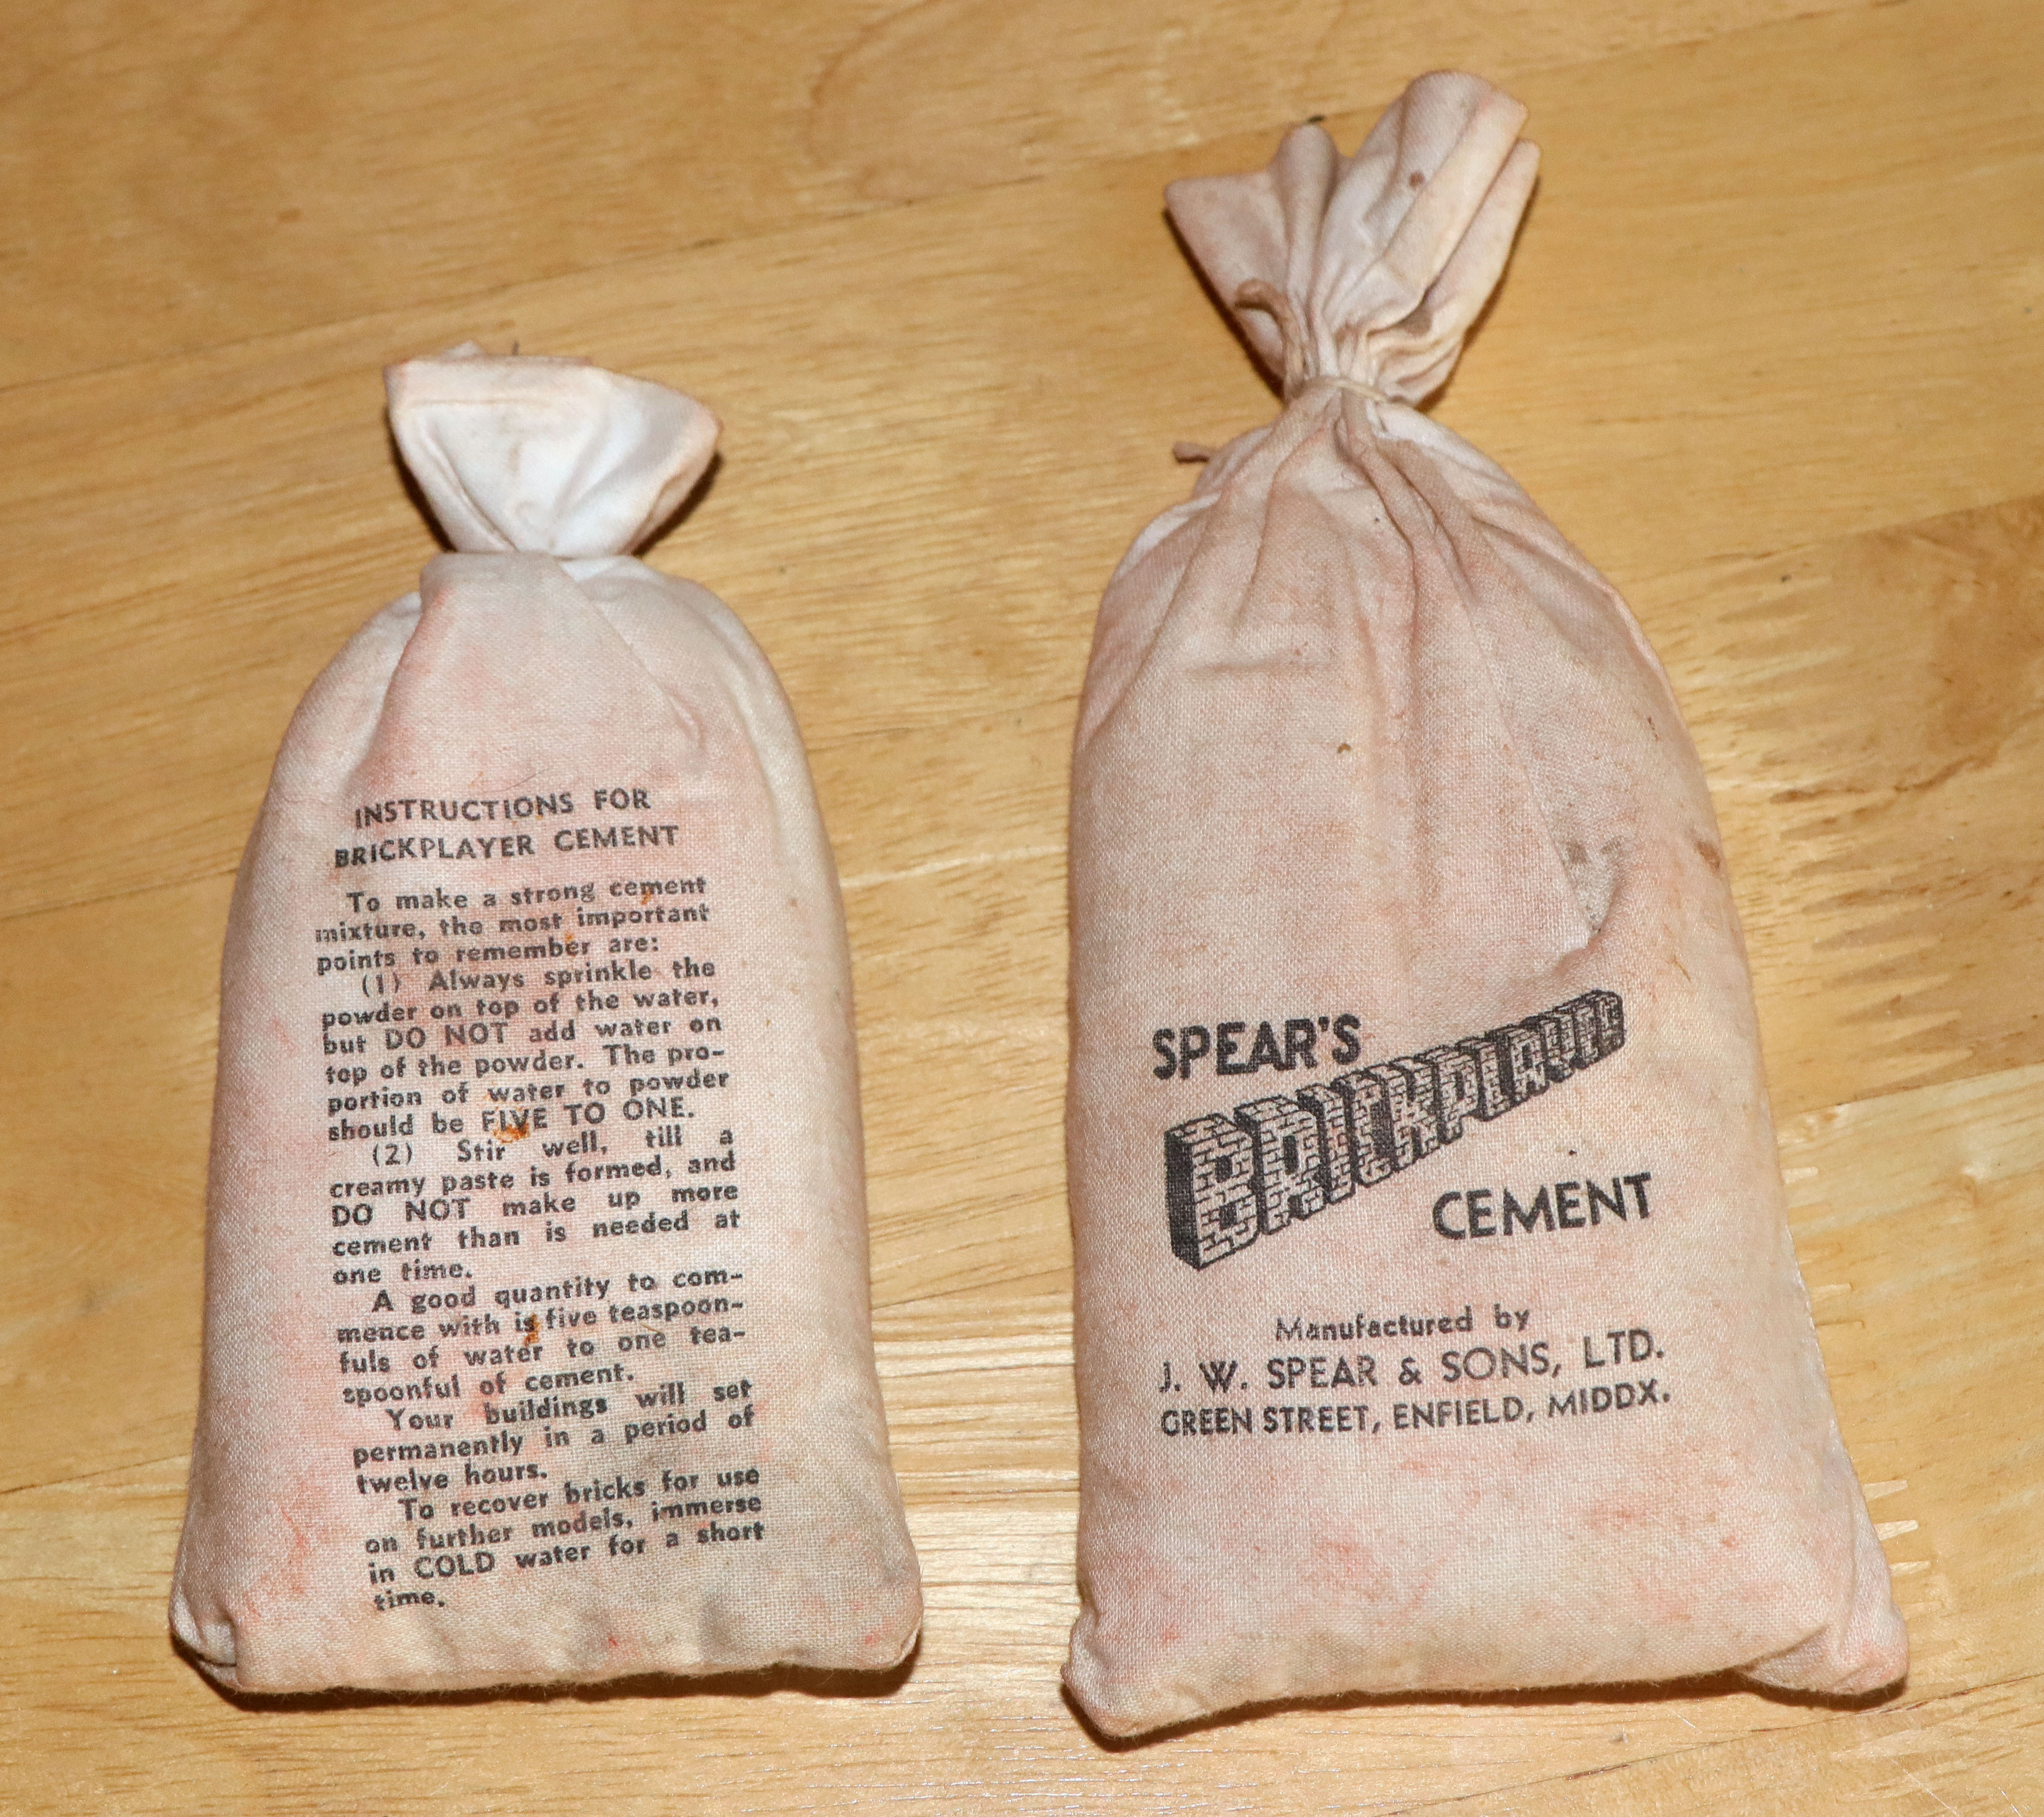
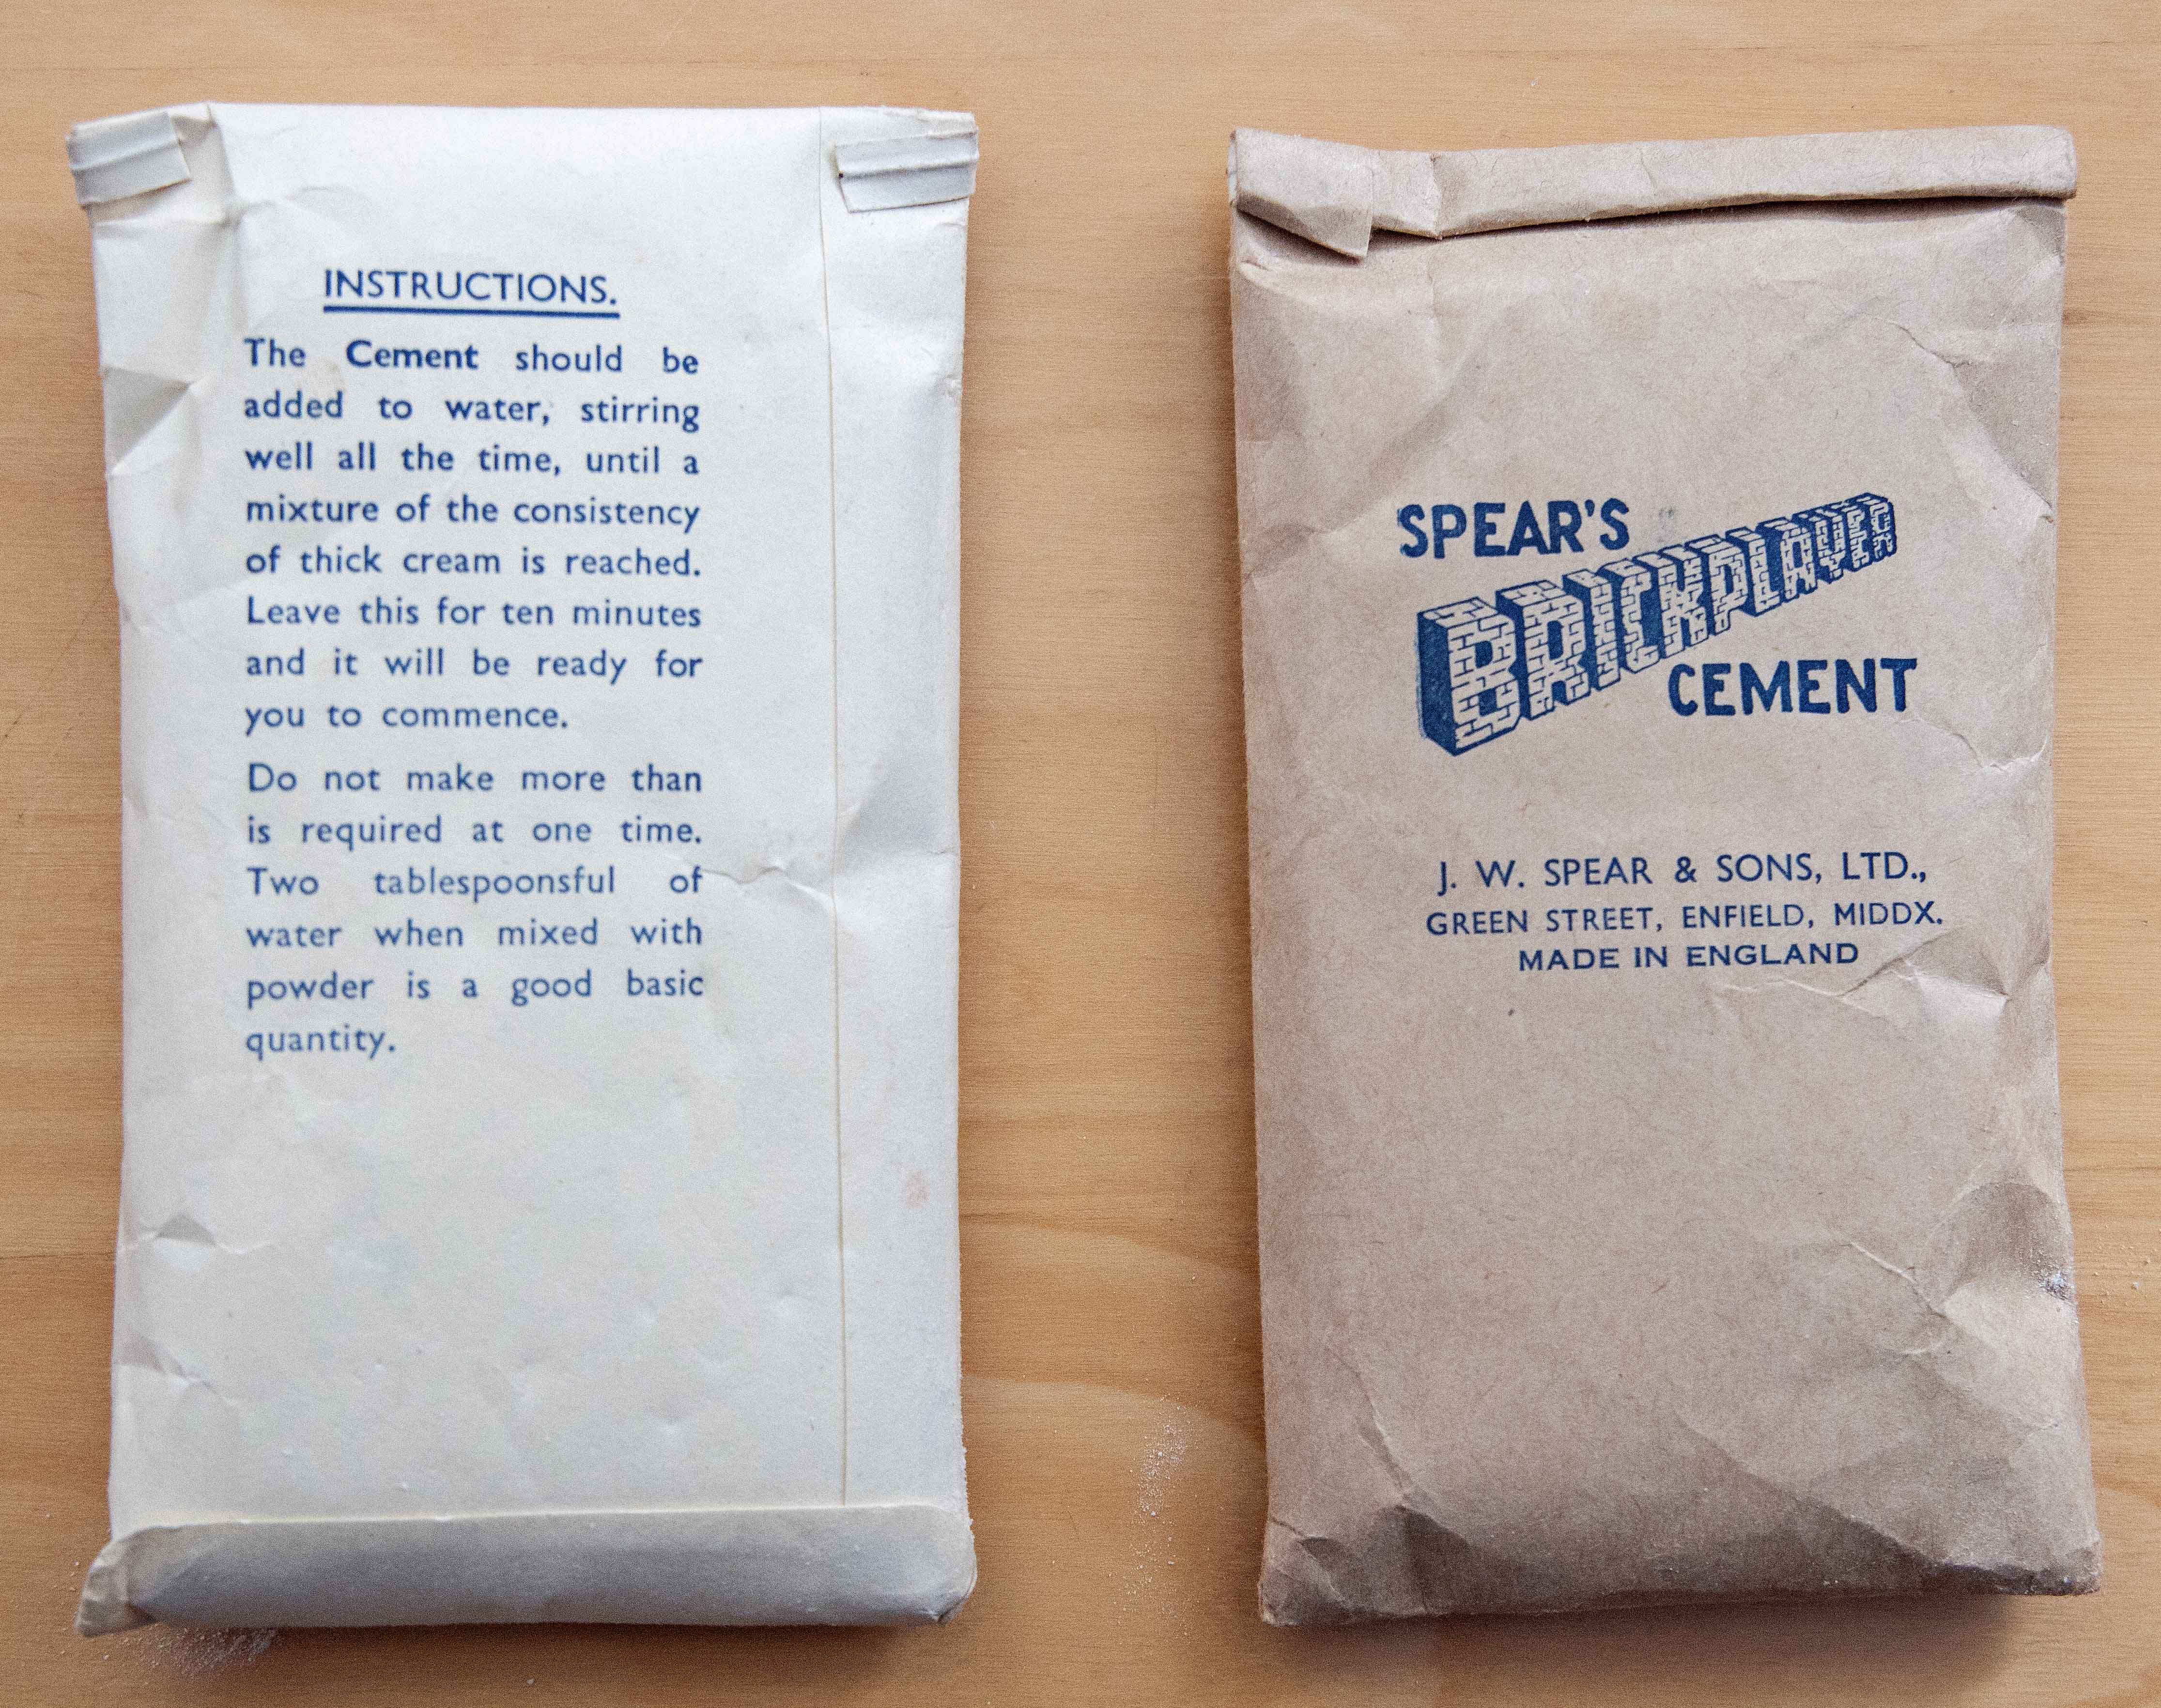
Cement from a Pre-War Kit B5 is shown on the left. It is supplied in a cloth bag with instructions on the bag specifying that (a) it must be mixed by adding one part of cement to five parts water and (b) models must be separated in cold water. The latter injuction is reinforced in the building instructions for the Pre-War kits which stressed not to use hot water.
The right hand image is of a bag of cement of the type used in all Standard and Contemporary kits. The bag is made of paper. Instructions on the back do not specify a particular ratio of cement to water. Cement is in a cloth bag in the American kits I have, but the instructions on the back are the same as the right hand image, so I assume the contents were the same.
However, the Pre-War cement may have been different. The building instructions say that the ground plans have been drawn to allow a small gap between bricks for cement. Blueprints for subsequent kits do not have such a gap; bricks will not fit on the blueprint if a gap is left. The Pre-War instructions also advise tamping down the bricks on each course to make them level. This is how real bricklayers work with real mortar but the cement for later kits would not work like that. It seems that the Pre-War cement would have produced a thicker mix, more like bricklayer's mortar.
Intact bags of cement are often found in kits today, but it seems that they may no longer be effective.
Brickplayer cement was not strong enough to bond windows and doors to the bricks securely, or to join pieces of roofing, so at least one tube or bottle of window/roofing cement was also provided in each kit. Although these are also often found in kits today, they have always gone solid and are clearly unusable.
As advised on the building techniques page, a good modern alternative to both kinds of cement is washable PVA glue.
More links: This Brickplayer website sits within my personal website tonyohagan.co.uk. The links below provide access to the other parts of my website.

|

|

|

|

|

|